


From A Sad, Old Garage To A Stunning Farmhouse Feature
Hi ,
Firstly, my new years resolution this year is to write more blogs! Life got super busy for me in the back half of 2025: I relocated to Melbourne for 4 months, renovated 8 houses for Season 6 of Space Invaders, came back home to Sydney & literally collapsed in a heap. 😉 So, here we are … the first cab off the rank for 2026.
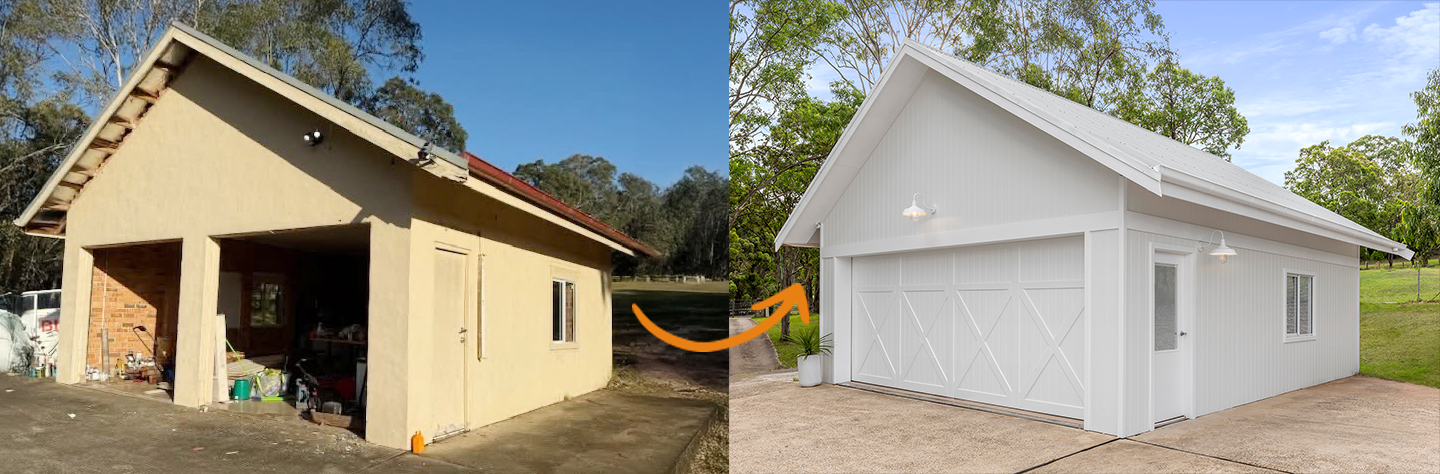
As someone who bangs on about the importance of street appeal for a living, I have to admit… my garage was honestly embarrassing! Drab, dated & (wait for it) without any garage doors for years on end, it had become the official dumping ground for “I’ll deal with that later” clutter, mountains of tools, random timber offcuts & mystery paint cans from god knows when.
The most ironic part? Despite it being a double garage, my rare 1956 Chevy Bel Air has been living outside for the last couple of years under an all-weather cover… simply because there wasn’t enough room to park it inside. 😲
Every time I pulled into the driveway, it was like my house whispered, “We’re doing so well & then there’s that.” So, after years of side-eyeing it, I decided it was time to finally do something about it. Late last year, my garage renovation journey began.
Watch the quick video below to see its transformation from start to finish:
WHY DID I DECIDE TO RENOVATE MY GARAGE?
When I bought this property, it technically came with a double garage… but as stated already, it had no garage doors. Yep. Two big gaping openings for years on end with about as much security as my teacup chihuahua.
On top of that, the whole space felt drab & dated – dull colours, lifeless walls and that classic “storage dungeon” vibe that makes you want to close the door… except I couldn’t, because there wasn’t one.
And then there was the centre column, splitting the garage into two single bays. If you’ve ever tried reversing into tight single garages, you’ll know it only takes one tiny lapse in concentration & suddenly you’re on first-name terms with your local smash repairer.
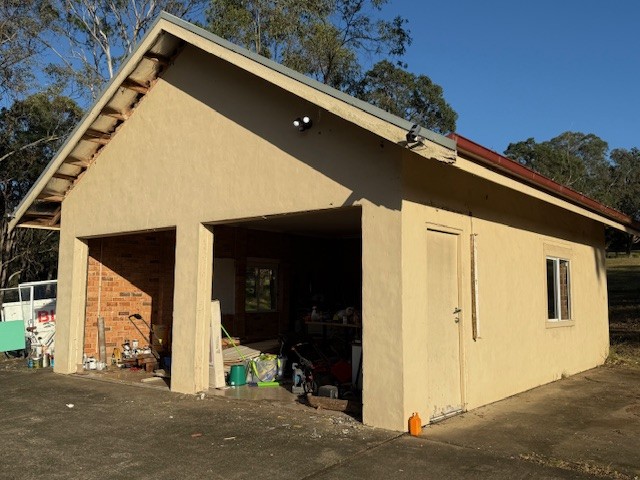
The central brick column divided the garage into two sections.
Now, the cheapest / easiest option would’ve been to leave the structure as-is, cosmetically refresh it (mostly through paint) & install two single garage roller doors. Realistic Budget: around $10K.
I wrestled with the decision – keep the garage as 2 single doors or remove the brick centre column & go for 1 larger opening requiring a lot more structural work, time & expense but …. make a bigger design statement? I definitely had that “be sensible Cherie” voice in my head but then the “do it properly” voice showed up with a sledgehammer.
WHY I CHOOSE 1 LARGE GARAGE DOOR VS 2 SINGLE DOORS
Yes, converting 2 garage door openings into 1 larger one does cost significantly more but here’s why I went for it:
- Better Street Appeal: 1 wide door looks premium & intentional. 2 doors can look busy (depending on the style).
- Easier Parking & Access: 1 big opening = less stress, better manoeuvring, fewer “oops” moments.
- Cleaner Lines & Symmetry: Removing the centre column instantly makes the garage frontage feel more open & balanced.
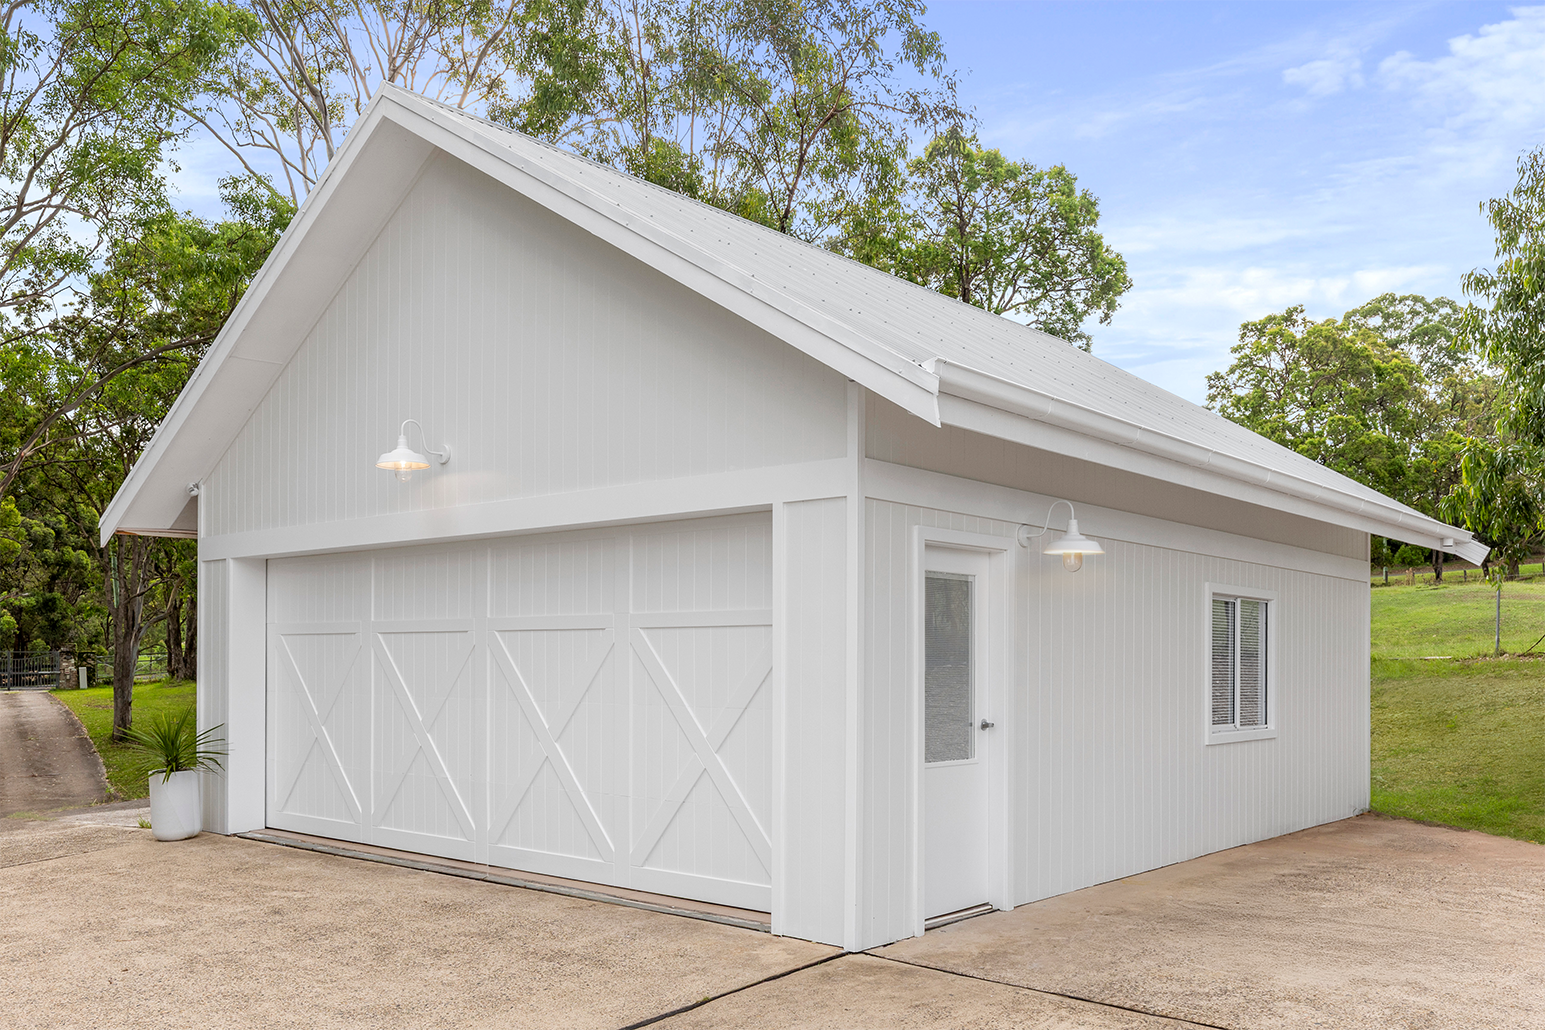
- Modern farmhouse impact: One statement garage door would help me nail the aesthetic I want across the whole property.

Before: The garage was dull, dated & devoid of any security.
THE STEP-BY-STEP TRANSFORMATION
If you’ve ever thought about renovating your own garage, here’s the simplified step-by-step process of how mine came together, in the right order (because sequencing matters, my friend!).
STEP 1: DECIDE THE TYPE & STYLE OF GARAGE DOOR FOR YOUR HOME
Garage doors have gotten seriously fancy in the last decade & rightly so. They can consume up to 50% of your home’s facade so they’re not just “functional”, they’re very much a design feature these days.
The reality is: there are soooooo many garage door types, styles & profiles these days, that choosing “the one” can feel like you’re swiping on a dating app. Timber-look? Sleek? Modern? Help.
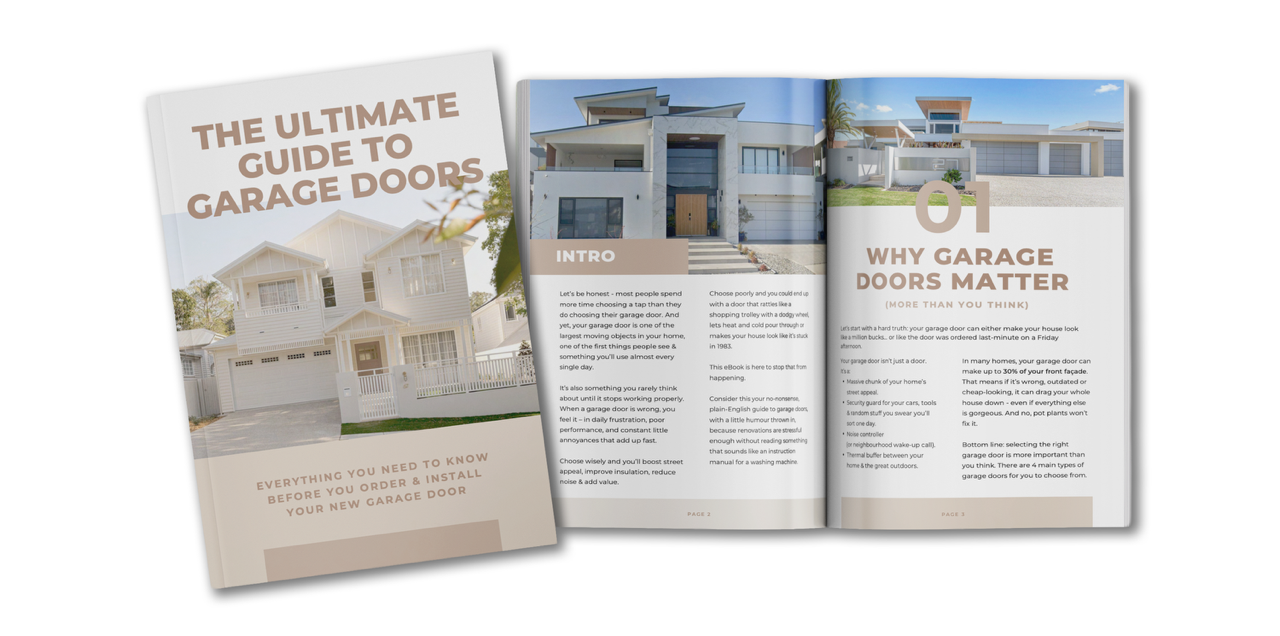
To save you the headache & overwhelm, I developed a free eBook for you:
“The Ultimate Guide To Garage Doors” – it’ll help you pick the perfect match for your home without having a meltdown.
👉 Enter your email to download the free guide instantly.
"*" indicates required fields
STEP 2: WORK OUT IF YOUR CENTRE COLUMN IS STRUCTURAL
Before you go full demolition-ninja, find out if that centre post / column is load-bearing. Don’t rely on Uncle Bob’s free advice & a gut feeling – hire a structural engineer. That professional will inspect your garage then email through a structural engineering plan detailing what beams / materials you need to safely create the wider opening. Timeframe: allow 2–3 weeks.
- Typical cost: $2,000 to $4,000 inc GST (varies by location).
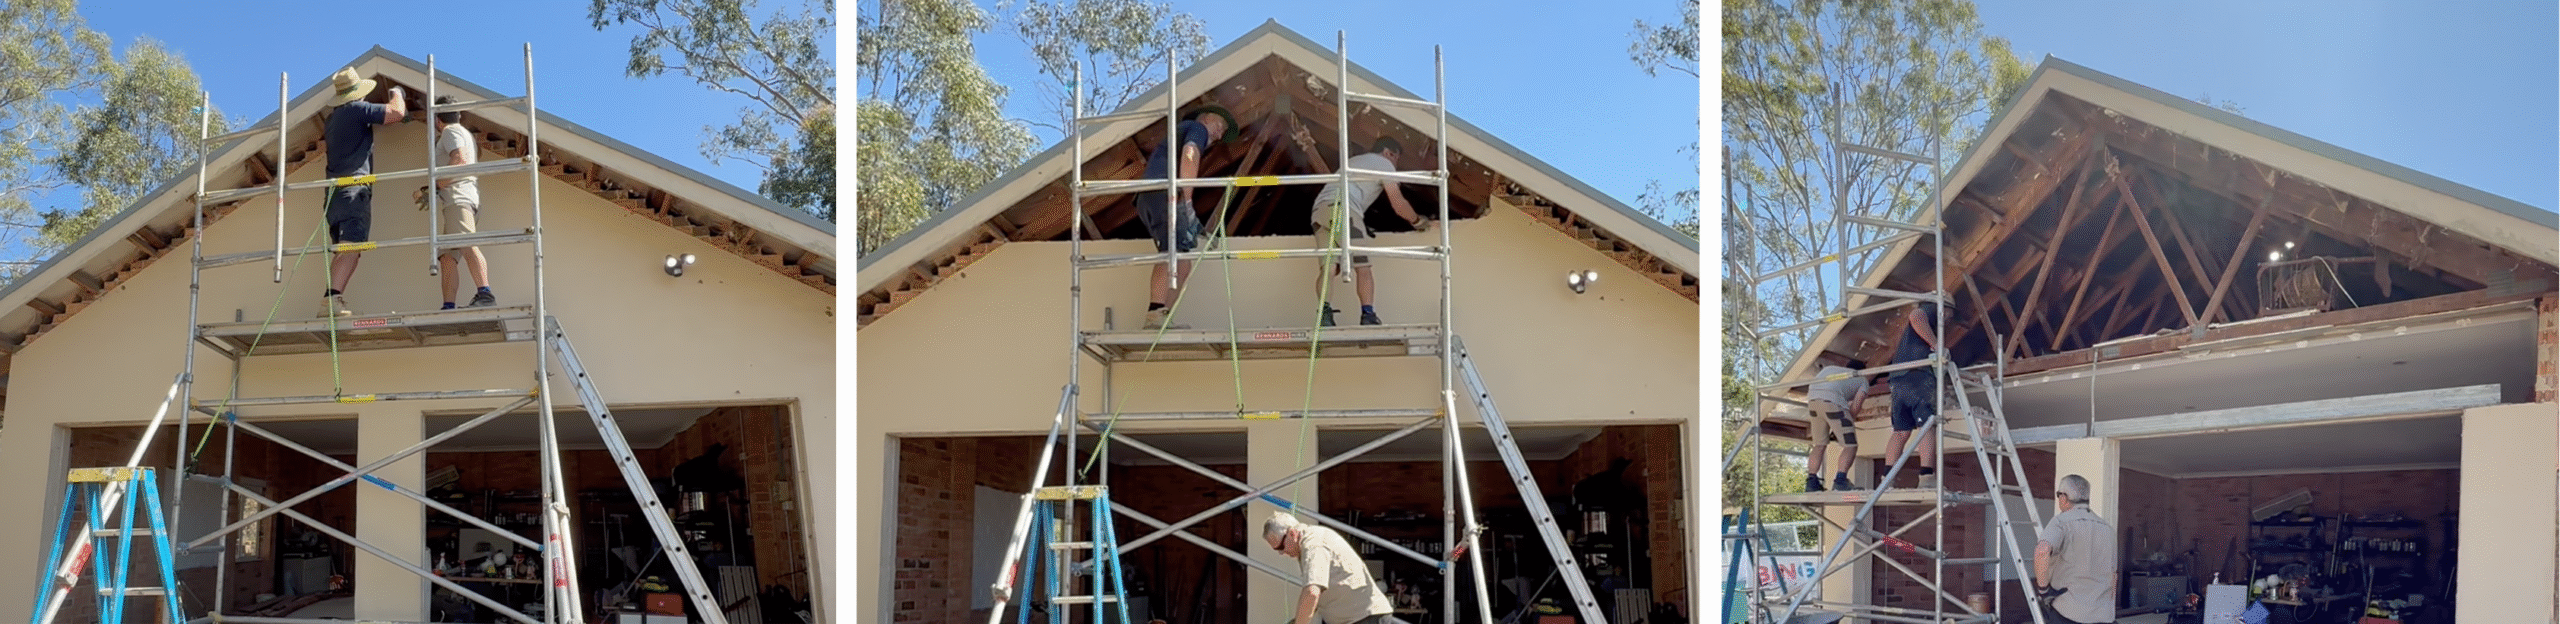
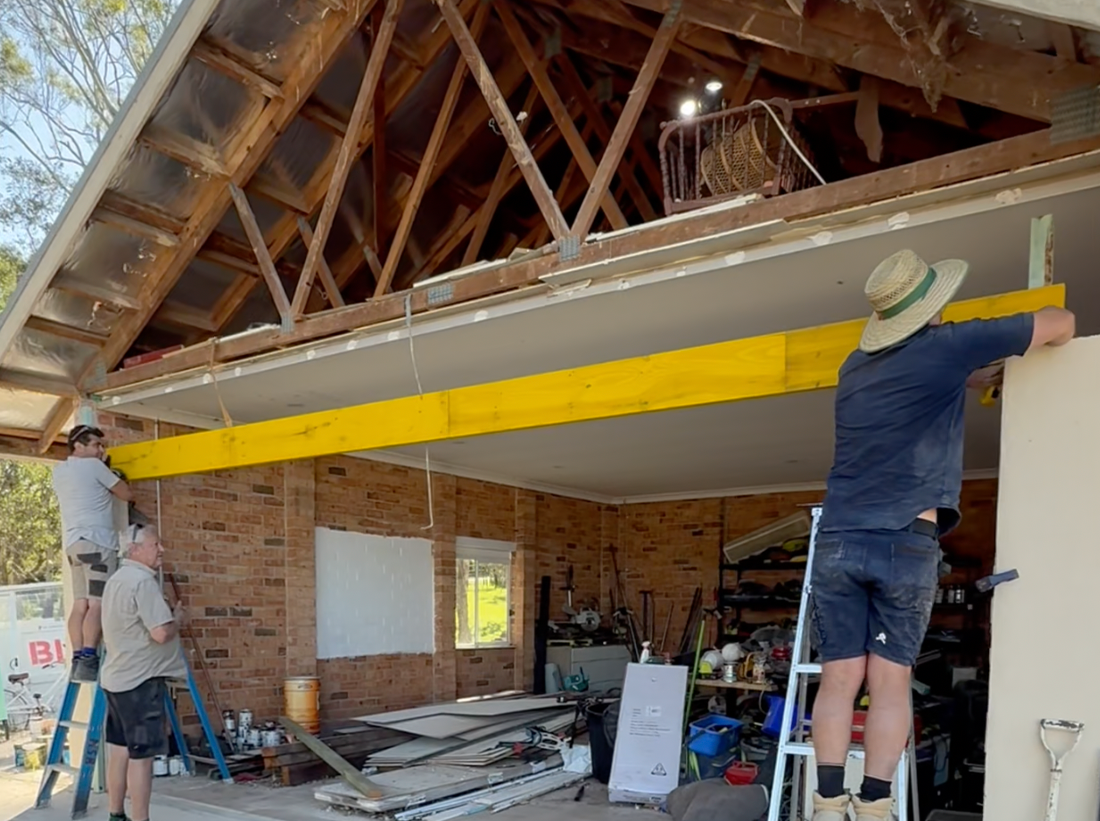
STEP 3: REMOVE THE STRUCTURAL COLUMN
For my garage reno, I hired 3 senior carpenters who removed the brick facade, brick by brick, working from the top, down. It took two of them 3 hours in total to complete this task.
The second that centre column came out, the garage instantly felt bigger – like the space took a deep breath & said, “THANK YOU.”
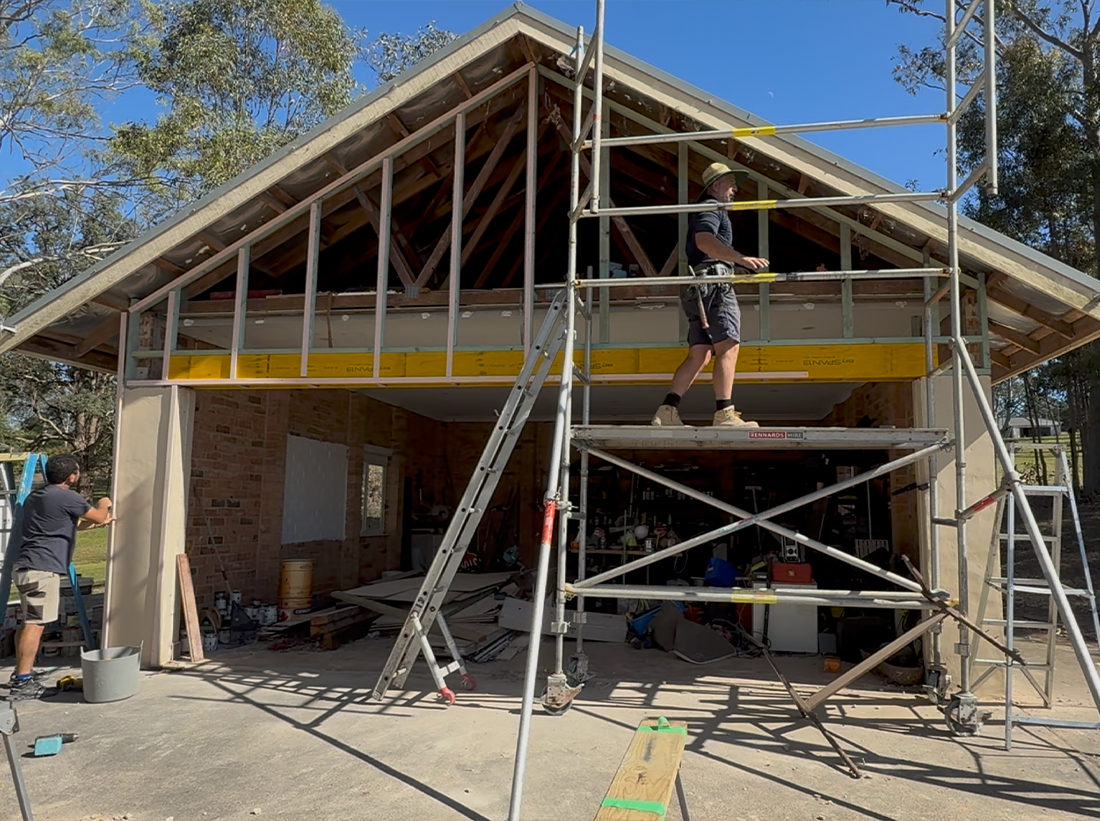
STEP 4: INSTALL STRUCTURAL LVLs
LVL = Laminated Veneer Lumber. It’s strong, stable & perfect for structural openings. My team installed two long LVLs side-by-side in about 2 hours. Cost for the materials: $724 excluding labour to install them.
Pro tip: If you’re ever considering widening an opening or removing posts, LVLs are often the answer but they must be correctly specified & installed.
My chippies installing 2 structural LVL’s.
STEP 5: REBUILD THE FRONT FACADE WITH TIMBER FRAMING
We rebuilt the front facade using 90 x 45 treated pine framing — quick, cost-effective & lighter than reinstating brick. This kept the structure lightweight & was a far easier option to anchor our new wall cladding to, verus brick.
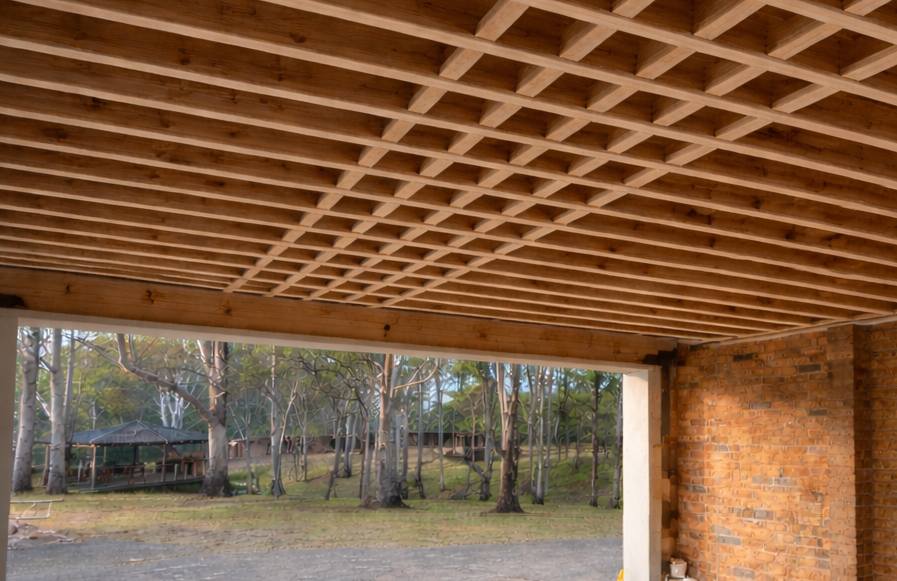
STEP 6: INSTALL TIMBER BRACING IN THE GARAGE CEILING (BEFORE PLASTERBOARD)
Yes this is a boring-sounding step but it’s a critical one. Garage door tracks & motors need solid fixing points on your walls & ceiling (depending on the style of garage door you choose). Before any wall / ceiling sheeting could go up in the garage internally, my chippies had to install extra framing in the ceiling, in the right spots, where the garage door track & motor is likely to be positioned.
STEP 7: SITE “CHECK MEASURE” BY YOUR GARAGE DOOR SUPPLIER
This is the step where people often stuff up. Before you sheet your garage walls & ceilings, call your garage door supplier back on-site to confirm:
- your timber framing is in the right spots.
- your timber bracing is sufficient for the garage door weight.
- there’s enough bracing around where you motor will be located.
- your electrical power point is in the spot to avoid long electrical plugs.
For this garage reno, I choose Gliderol Garage Doors. One quick phone call to their rep & they were on site the next day cross checking everything. My chippies did a great job but the Gliderol rep requested we add a little more ceiling bracing in one spot to cater for the weight of the extra-large door. This saved us ripping out plasterboard during the garage door installation phase (a mistake that the Gliderol rep informed me is way more common than you’d think, even amongst experienced builders).
STEP 8: ELECTRICAL ROUGH-IN
Next up was the electrical rough-in stage where my sparky came in & ran new wiring for 2 exterior wall lights & the powerpoint for the garage door motor, before the walls & ceilings were plasterboarded over.
I already had existing powerpoints throughout my garage but if you’re planning a garage reno of your own, make sure you allow for proper lighting, power points in logical locations that are easy to access, wiring for your garage door motor and any future additions you may want to put in like a workbench zone, tool charging station, mini fridge, etc.
STEP 9: INSTALL WALL CLADDING
This is the step where the garage started to look like a proper design choice, not a leftover space. I clad the garage in Exterior Fibre Cement Sheeting (hello modern farmhouse vibes + goodbye questionable walls). The vertical lines instantly made the garage feel more architectural & intentional. We also installed a new side door and finished everything off with exterior trims & architraves.

Exterior fibre cement sheeting was used to make the walls look more architectural.
STEP 10: GARAGE DOOR CHECK MEASURE (FINAL)
Once all the exterior cladding & trims were installed, the Gliderol rep came back on site & did the final check measure. This is where exact measurements of the door cavity & other parts of the garage are obtained so the garage door can be officially made.
STEP 11: GARAGE DOOR INSTALLATION
8 weeks later my garage door arrived & for me, this was the main character moment, seeing my new garage door get installed!
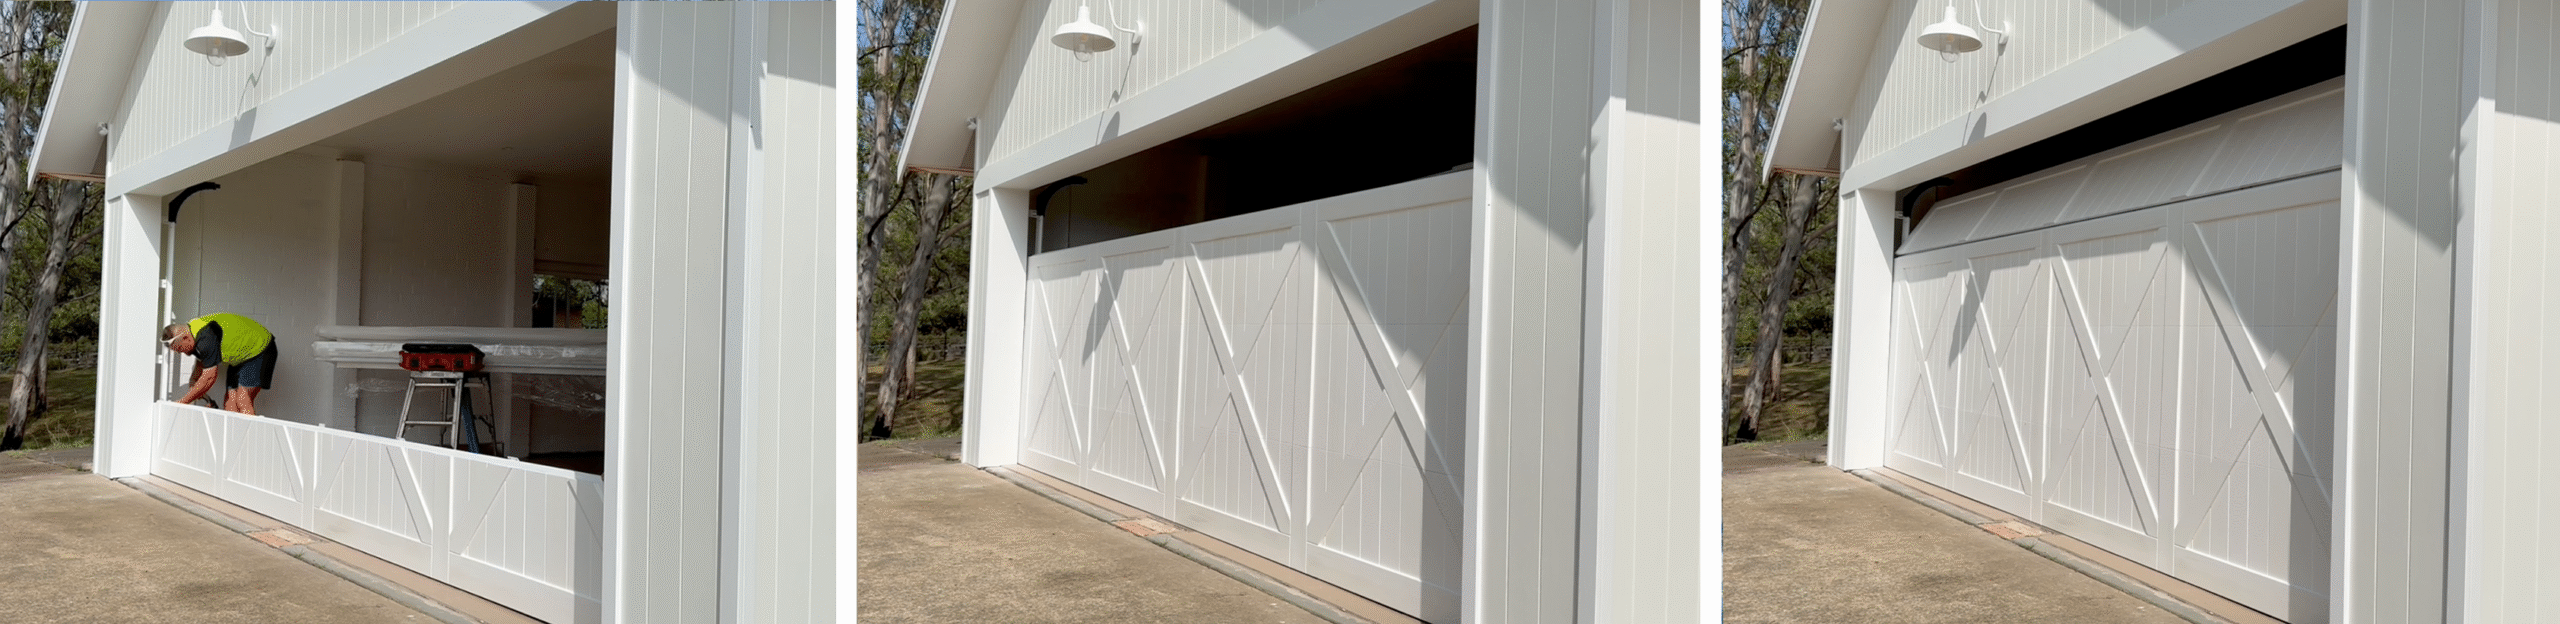
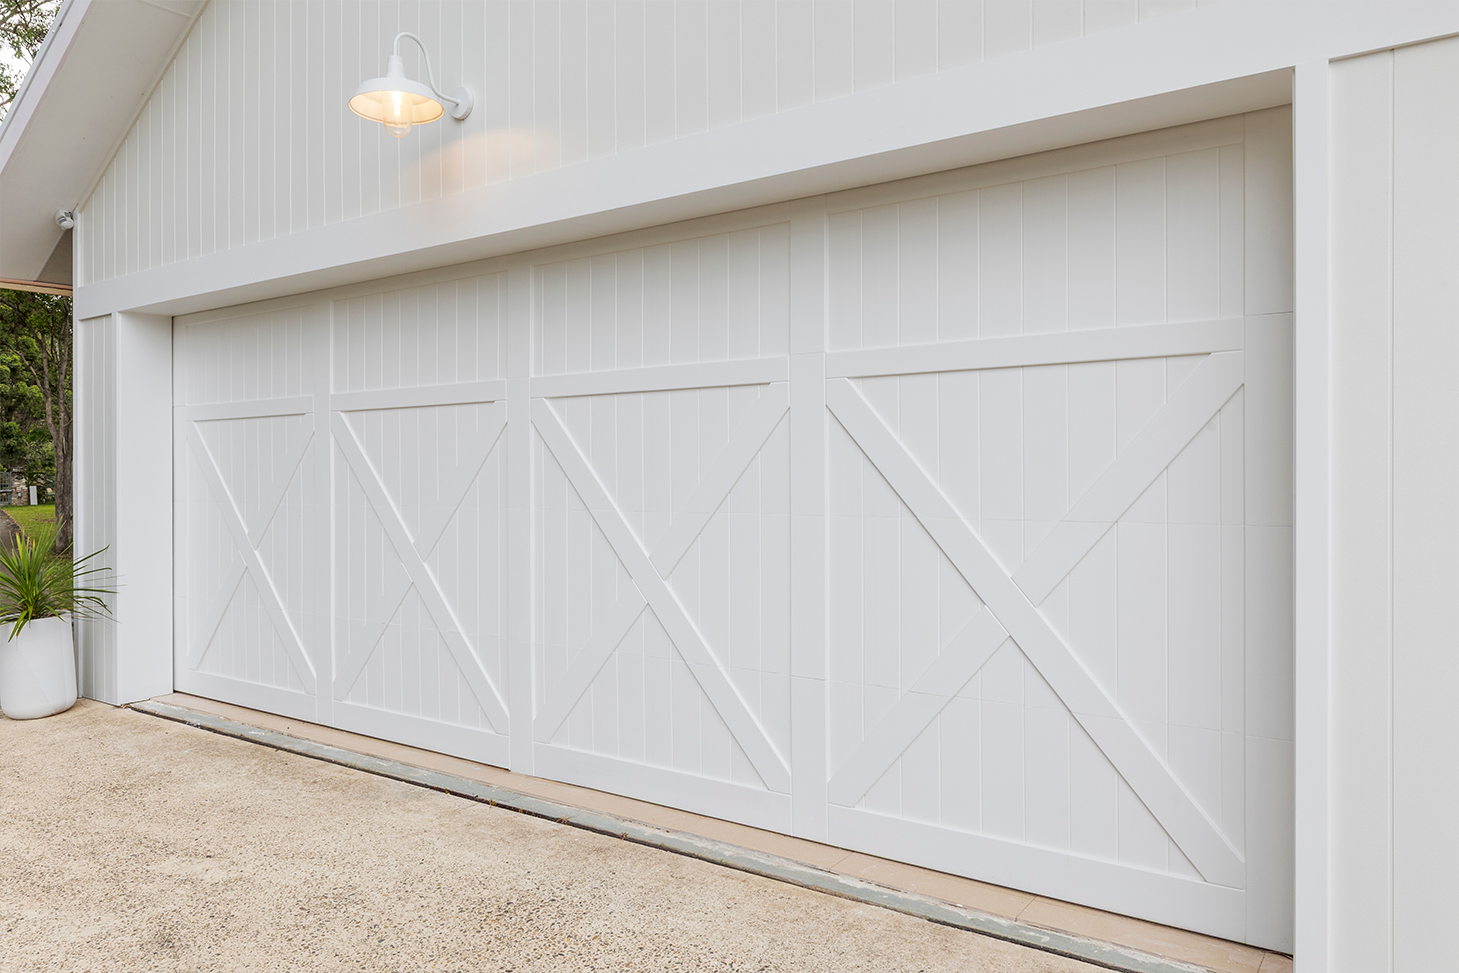
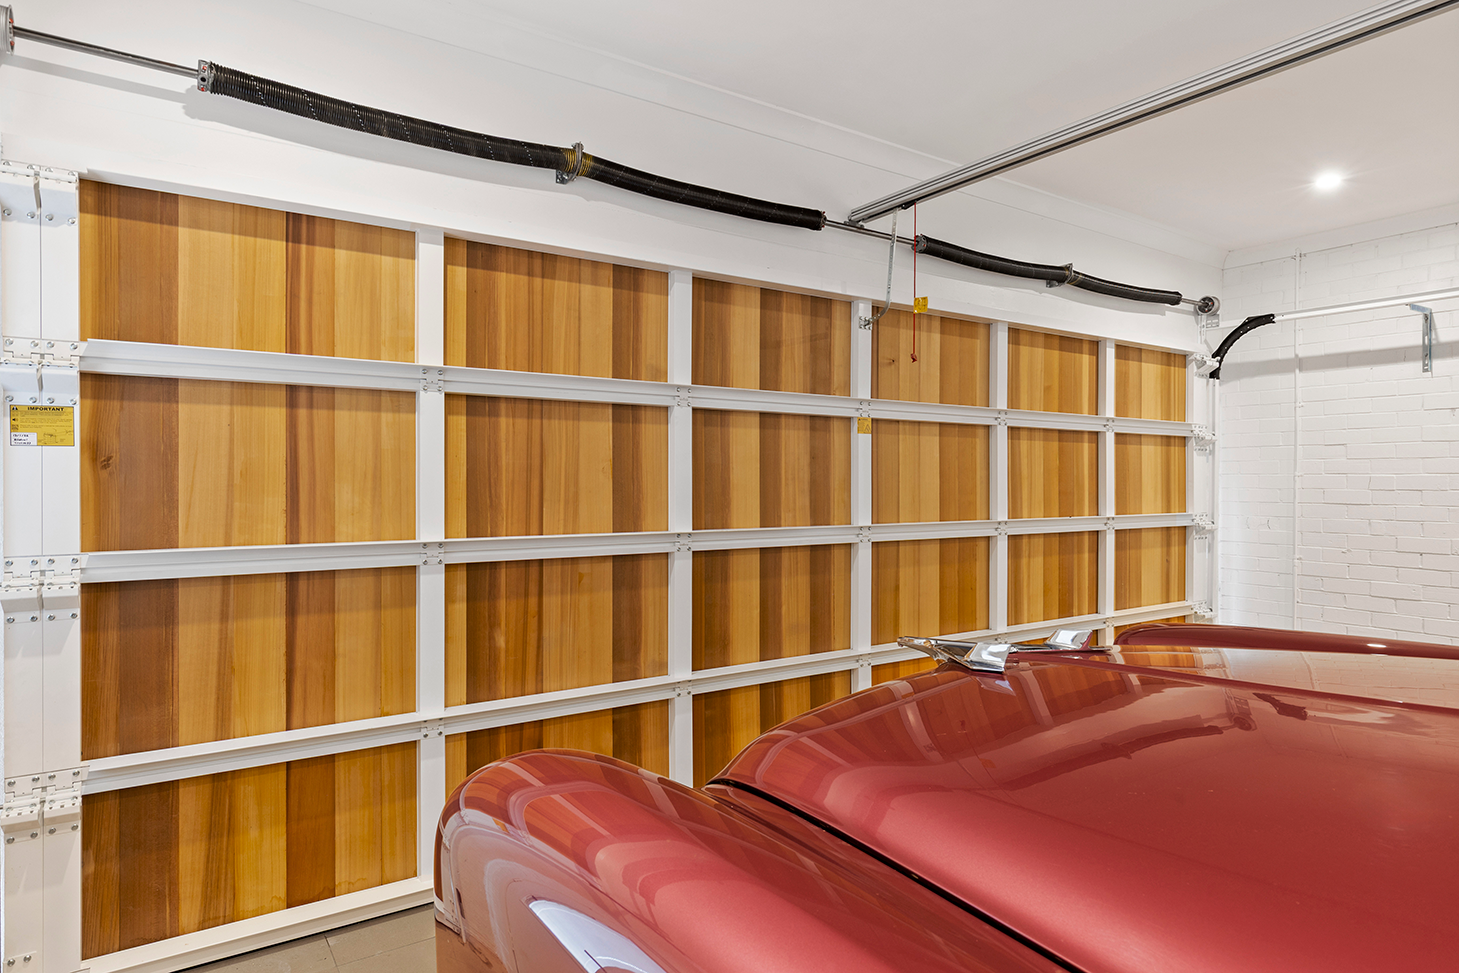
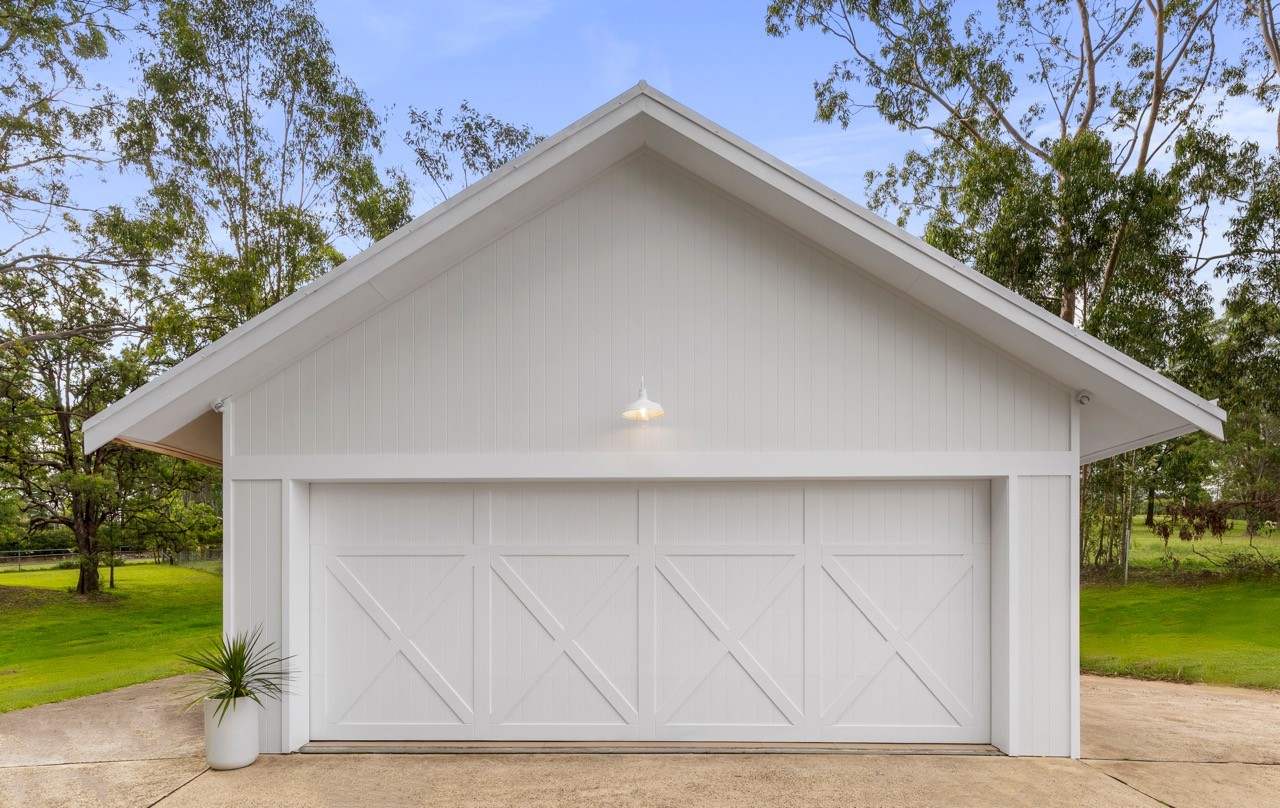
I choose a custom made sectional style garage door from Gliderol’s Danmar Range & it was definately worth the wait.
The front of the door contains all the beautiful intricate detail you’d expect on a farmhouse style door & on the back, gorgeous Australian cedar timber gives it a luxe feel. Yes, it’s a bit fancy & is definately one of those doors that makes you go: “Hang on… garage doors can look THAT good?”
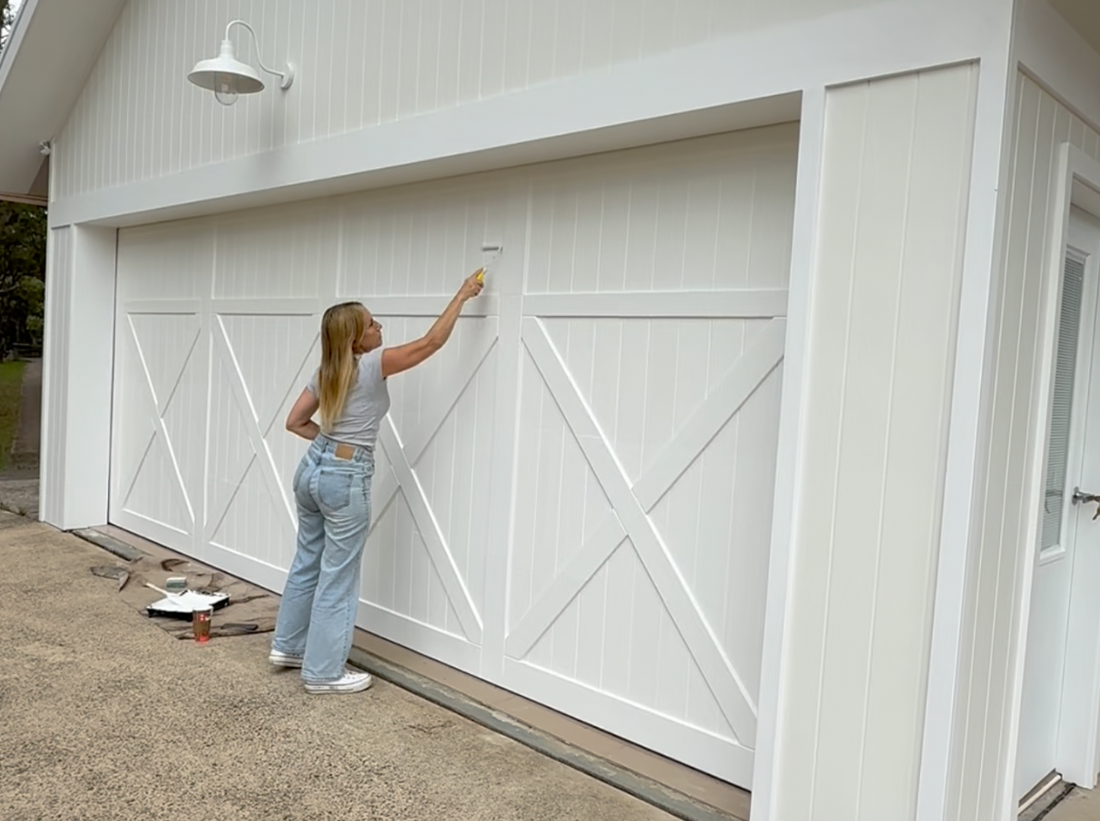
STEP 12: PAINTING
On the home stretch …. my garage door came pre-primed. We painted all the garage walls in exterior paint in Taubmans Designer White & all the garage architraves, trims, side door & my new garage door in Taubmans Crisp White for contrast. The goal was for the paint scheme to complement the garage door, not compete with it.
STEP 13: THE FINISHING TOUCHES
The very last step involved my sparky fitting off the new lights, fixing any touch ups & giving the driveway (as far as the garden hose reached) a high pressure water clean. Years of built up grime & dust on the driveway, blasted away in hours!
FINAL THOUGHTS
Was it worth the investment? Absolutely.
This wasn’t just about making the garage “nicer.” It was about:
✅ better functionality.
✅ improved security.
✅ more street appeal.
✅ a stronger farmhouse look.
✅ making the garage feel like a deliberate part of the property.
Total Garage Renovation Cost: $47,000 including GST.
All said & done, I spent exactly $20,000 for the supply & installation of the large garage door (price will vary according to your location). All of the trade labour was $16,000 & $11,000 for all of the materials, inclusive of GST.
I haven’t got my property formally revalued by the bank (& don’t intend to at this stage of the renovation) however I genuinely believe this garage reno has lifted the value of my property by at least $75,000 to $100,000 which is always the sort of “double your return on investment” number you want to aim for, when you’re renovating.
Here’s what I learnt along the way:
Garages aren’t boring. Boring garages are boring.
When you get the structure, the bracing & the appearance right, your garage stops being a dumping ground & starts being a real part of your home – functional, secure & (dare I say it) genuinely good-looking. Most importantly, my prized Chevy now has a secure home which anyone who owns a classic, will appreciate.
If my garage reno has inspired you to tackle yours, simply contact the Gliderol Garage Doors team on 1300 799 177 or via www.gliderol.com.au to arrange your free measure & quote.
Until next time,
Cherie (CB x)


I like the efforts you have put in this, regards for all the great content.
Glad you found the blog valuable. Thank you Ryker. Cherie Crew.