


From Laundry Piles to Lux Living Spaces
Hi ,
When you have 6 kids in any family home, keeping your house stylish & orderly is like trying to comb your hair in a windstorm – chaotic but not impossible.
In last week’s episode of Channel 9’s “Space Invaders,” we encountered a family submerged in an endless ocean of laundry. Karisha (the dedicated mum), found herself entrenched daily in the ceaseless cycle of washing, drying, folding & ironing, mastering these tasks with remarkable efficiency. However, the seemingly simple act of returning the laundered items back to their rightful drawers & wardrobes, always seemed to get the better of her. More often than not, these garments would find themselves stack piled in different rooms, cluttering spaces meant for family gatherings, even invading the private sanctuary of the couple’s master bedroom.
So, when the challenge arose to renovate a family room & master bedroom that had completely lost their charm under the weight of countless clothes piles, it was time for me to roll up my sleeves. My goal? Revitalise these areas, transforming them from zones of disarray into bastions of style, all while fostering a sense of family unity within the home.
THE FAMILY ROOM
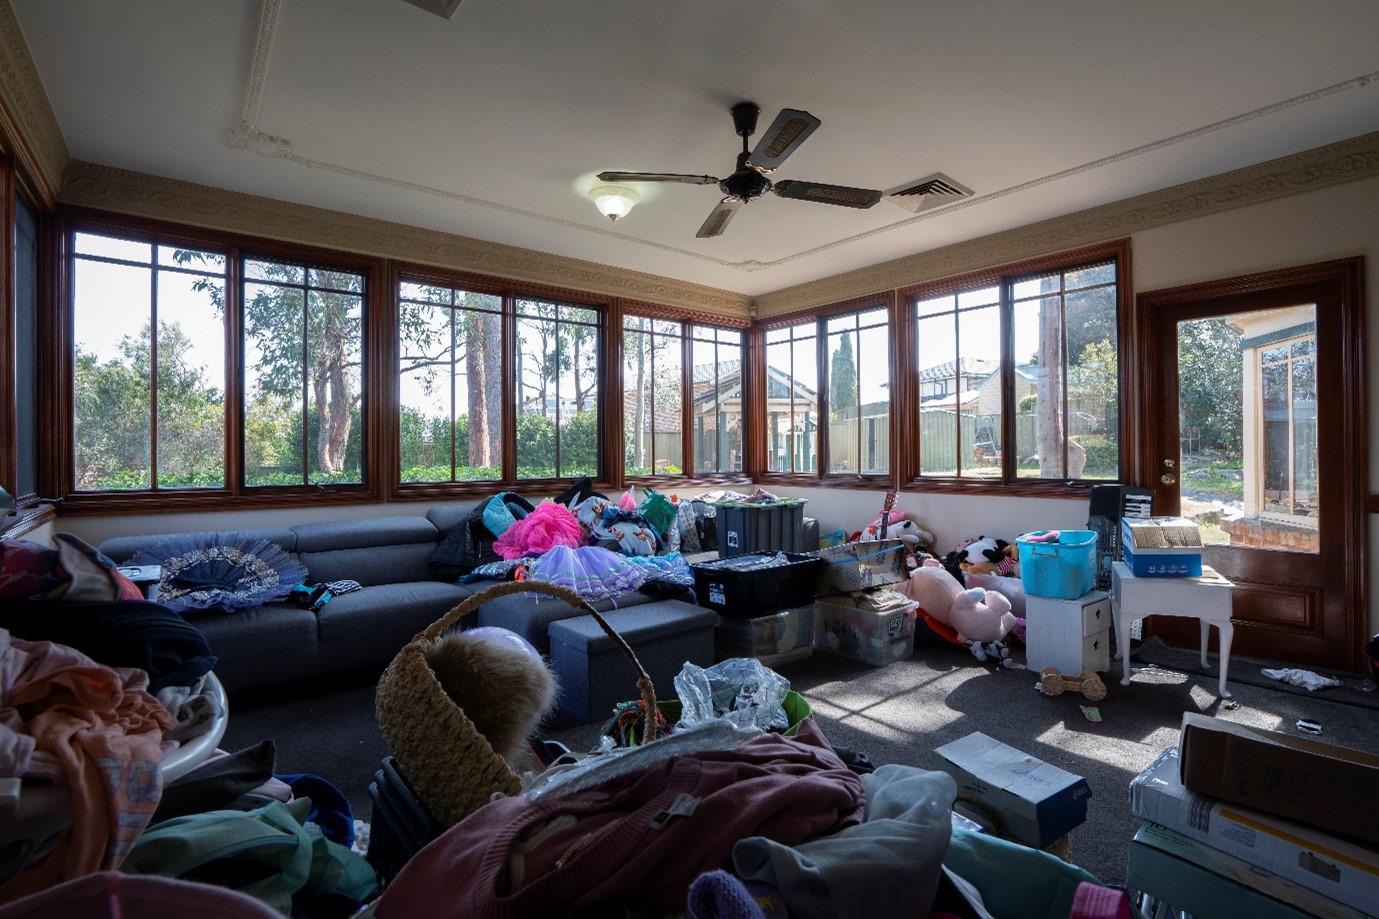
Imagine a room with potential written all over it, yet it’s so bland that even the sofa seems to be inching its way to the windows & doors in an attempt to get out. This family room, blessed with gorgeous big windows on three sides, was the perfect canvas for a modern makeover.
 Family Room – Before
Let’s look at what’s good with the room:
- It’s a decent size – 5 metres in width x 5 metres in length approximately;
- It has great windows on 3 sides of the room that let plenty of natural light in;
- The carpet is in great condition so doesn’t need replacing;
- Everything is in pristine condition so no structural works required;
- The sofas are the perfect size so also don’t need replacing.
As for the not-so-good points:
- The room is serving no real function & is not conducive to great family living;
- It’s severely lacking proper storage space;
- It’s bland & looking visually dated;
- The bi-fold doors are slightly old fashioned & a little clunky to use;
- The dark coloured ceiling fan draws your eye to the ceiling for no good reason;
- The coloured ceiling cornice draws your eye to the ceiling, again for no good reason;
- The single red brick wall seems out of place & visually doesn’t tie into anything in the room;
- The TV is too small for such a large room & its placement in one corner of the room, makes viewing it difficult;
- The sofa is pushed right up against the walls which doesn’t help the flow of how people move around the room & limits interaction between family members.
 Family Room – Before
First up, I added one of my favourite reno products, Easycraft’s VJ100 decorative wall panels to the walls within this room (except the brick wall) which instantly added texture & a designer look to the room. Once installed, my team & I painted them in Taubmans “Oil Shale” for a dark, moody, home cinema kind of vibe.
Next up, I had to get practical storage into the room so everything could be pulled off the floor & placed into cupboards behind closed doors. I purchased off-the-shelf Kaboodle cabinetry from Bunnings to create a long wall of cabinetry & installed a Trademaster laminate benchtop in “Opaque White” straight over the top .
Once the wall of cabinetry was installed, I painted the cabinets in Taubmans “Shoe Leather” that now visually matches the reddish / orange colours in that single brick wall. The painted cabinets & brick wall now look more cohesive together, eliminating the need to render or plasterboard that brick wall which saved a lot of time & money.
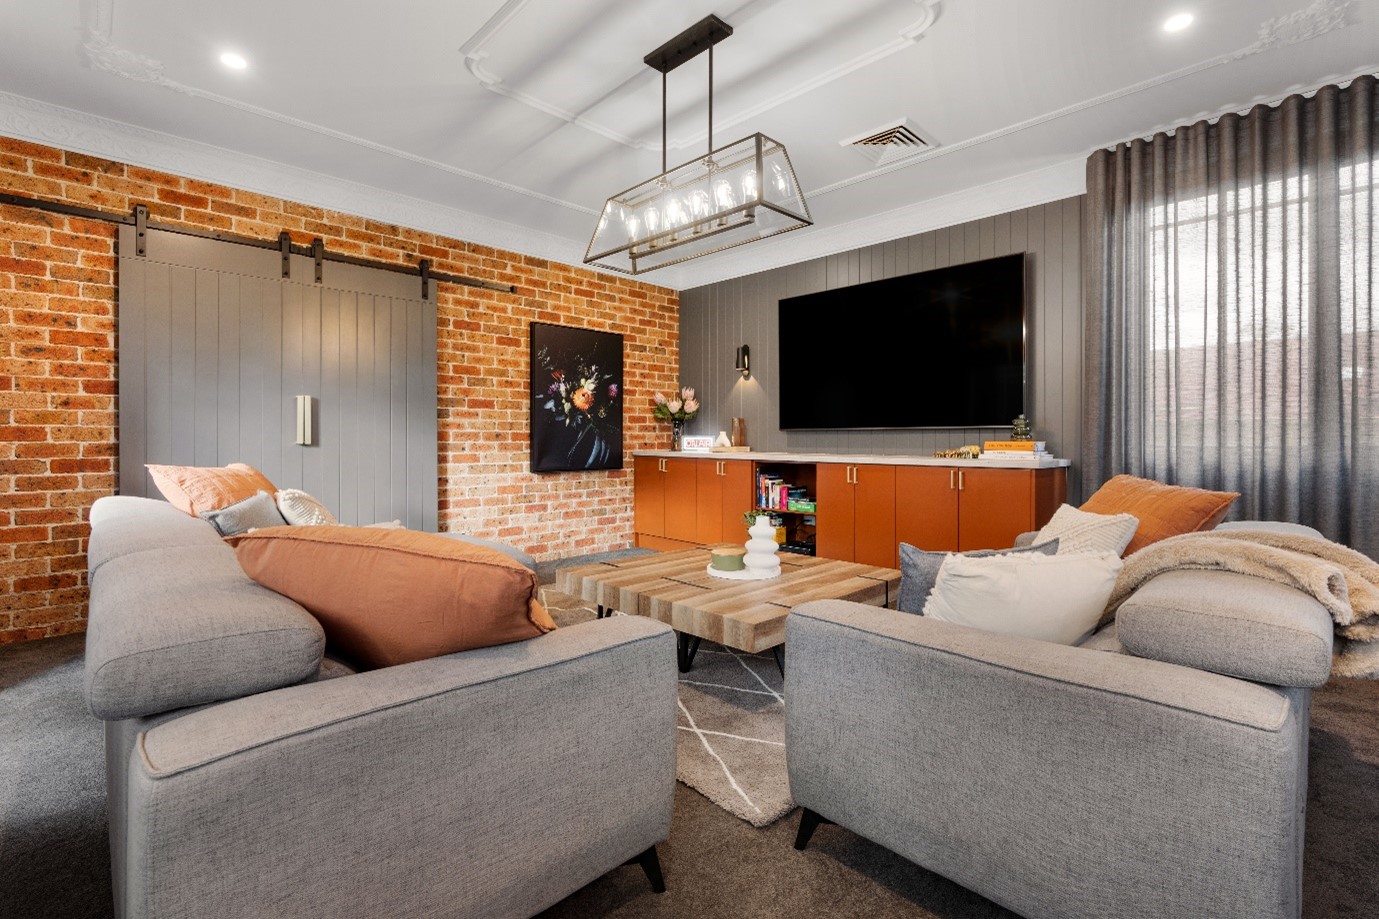
One of the issues with this family room was its insufficient lighting. Centre stage was a dark & unattractive ceiling fan, flanked by two small oyster lights on either side. As you can see in the “before” photo, the room is still dark with the lights on, even during the day! Knowing the wonders that good lighting does to a room, I installed a large feature light in glass that allows multiple streams of light to radiate out into the room, whilst 4 downlights installed in the corners of the room ensure the room will never have any dark spots. If you’re good at playing “Spot the Difference”, you may have noticed that I added a plaster cornice around the feature light. This frames the light in & makes it a real statement in the room.
Let’s turn our attention to the cream coloured bifold doors in the room. They worked, although were slightly clunky. I decided to remove & replace them with 2 x Hume Doors FBDS1 Barn Door that also feature the vertical line detail that the Easycraft wall cladding contained. Both the doors & walls now look like they belong together & I deliberately painted them the same wall colour for design continuity.
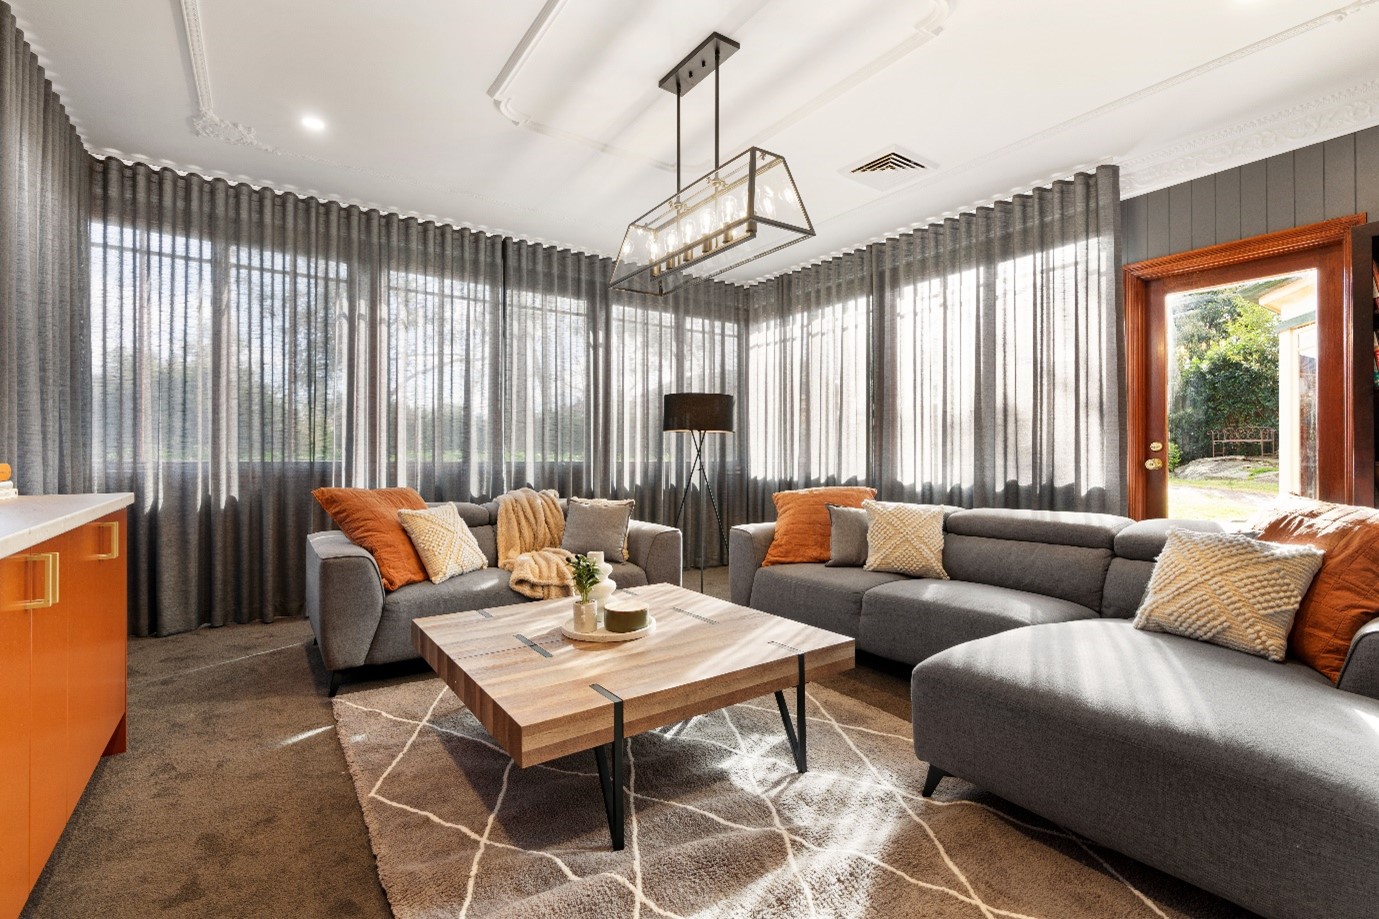
Now let’s talk those big windows … they’re amazing, letting all that natural light stream into the room. The only issue was the lack of privacy from the neighbouring properties, particularly at night when lights are on & everything becomes far more visible. This issue was simply solved by getting Wynstan in to make & install new ceiling mounted curtain tracks (that are hard to see as they blend in with the ceiling) with beautiful new sheer curtains that can easily be slid backwards & forwards at any time of the day.
Last but not least, I had to style up the room. I kept the original sofa’s as they were the perfect size for the room & in fantastic condition. Pulling the sofas off the walls not only looks fifty times better but also enables the family members to move more freely around the room. I ordered two identical coffee tables from Luxo Living & pushed them together so they became one large coffee table. Cushions & home decoration items, all from Kmart, complete the look. The pièce de résistance, that 80-inch TV, because if you’re going to do family movie nights, you might as well make them epic.
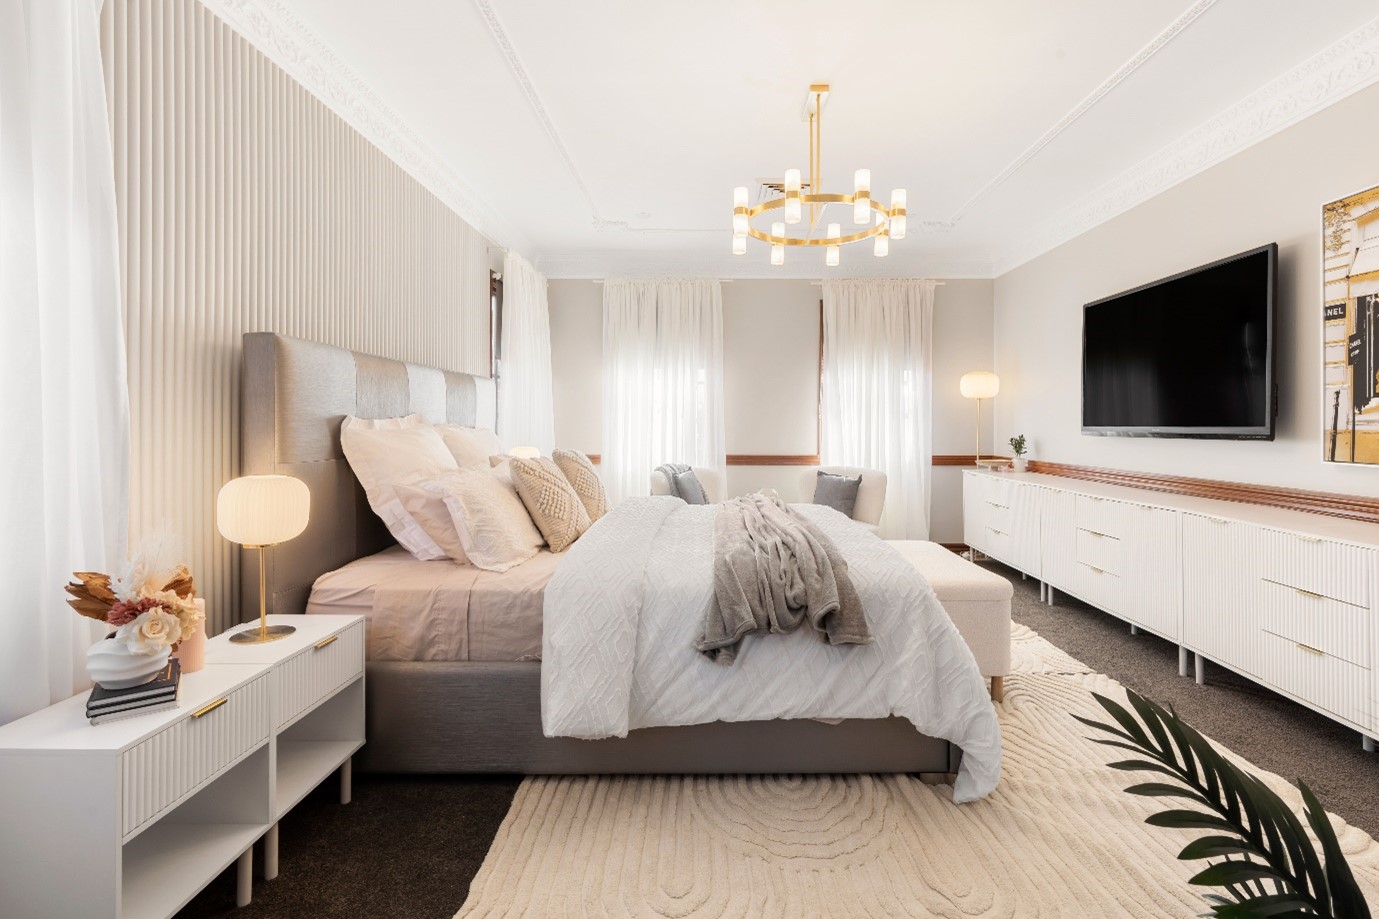
THE MASTER BEDROOM
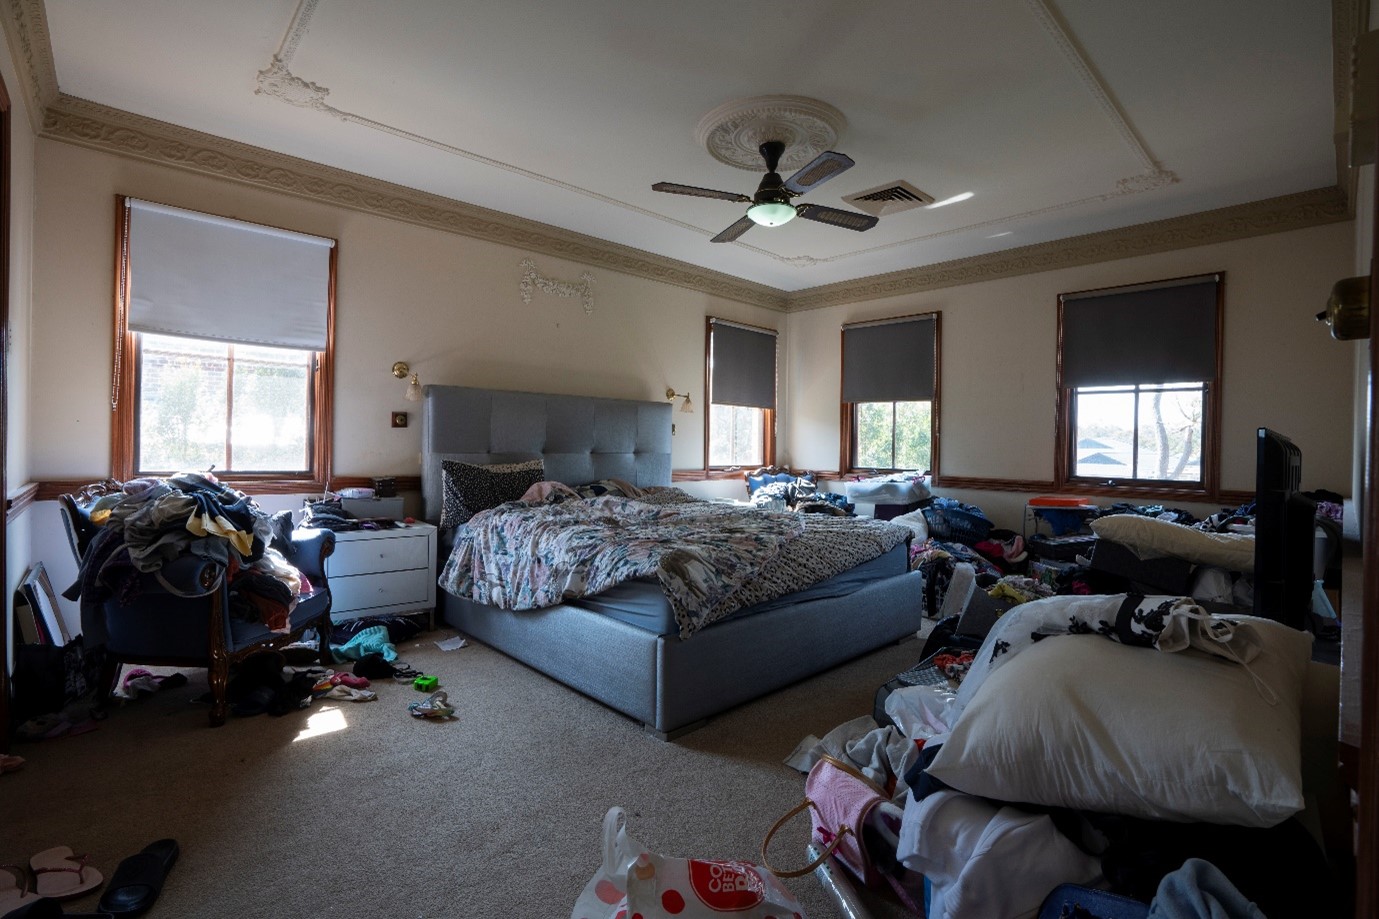
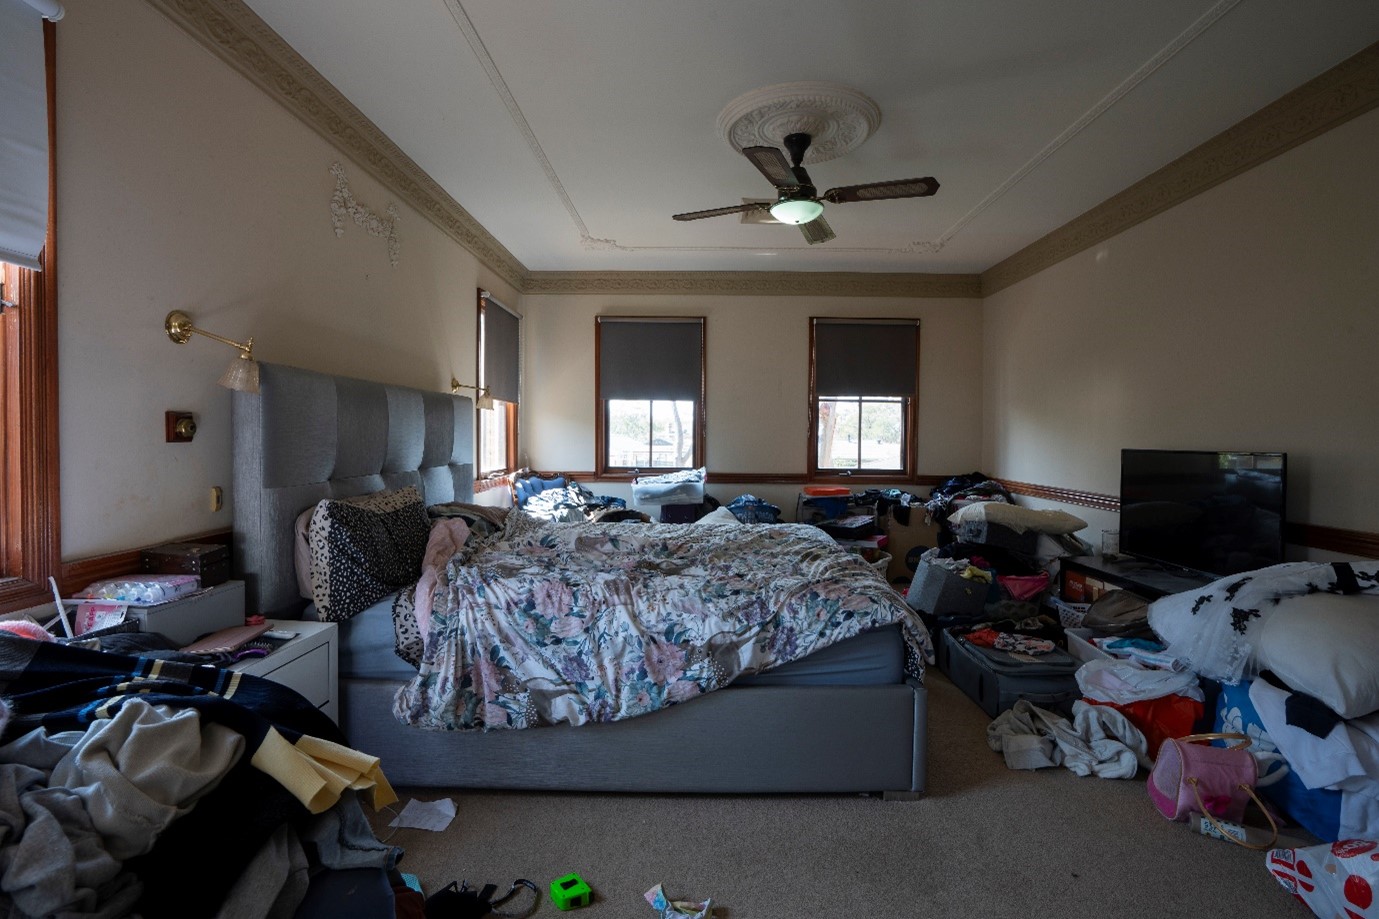
When you look at this room, it’s hardly the picture of romance, right? Like many other rooms within the home, boxes, clothes & general clutter had overtaken this room as well.
This is a double size bedroom so that gave me plenty of scope to add lots of storage in, something the room desperately needed. A separate walk in robe (not pictured) is next to the ensuite that didn’t need renovating & provides plenty of room for clothes to be hung up in. The only dowsnide of this room was all the windows, particularly on the bedhead wall but hey, you’ve gotta work with what you’ve got.
First up, I pulled the old carpet up & replaced it with new carpet from Flooring Xtra. To add texture to an otherwise very flat looking room, I installed the Easycraft Silhouette Cove Wall Lining Panels which you buy straight off the shelf from Bunnings. These panels instantly visually amp up the room & make it look far more sophiscated. Once installed, I painted all the walls up in Taubmans “For Kicks” colour, working with the natural trims (at the homeowner’s request) rather than painting those white.
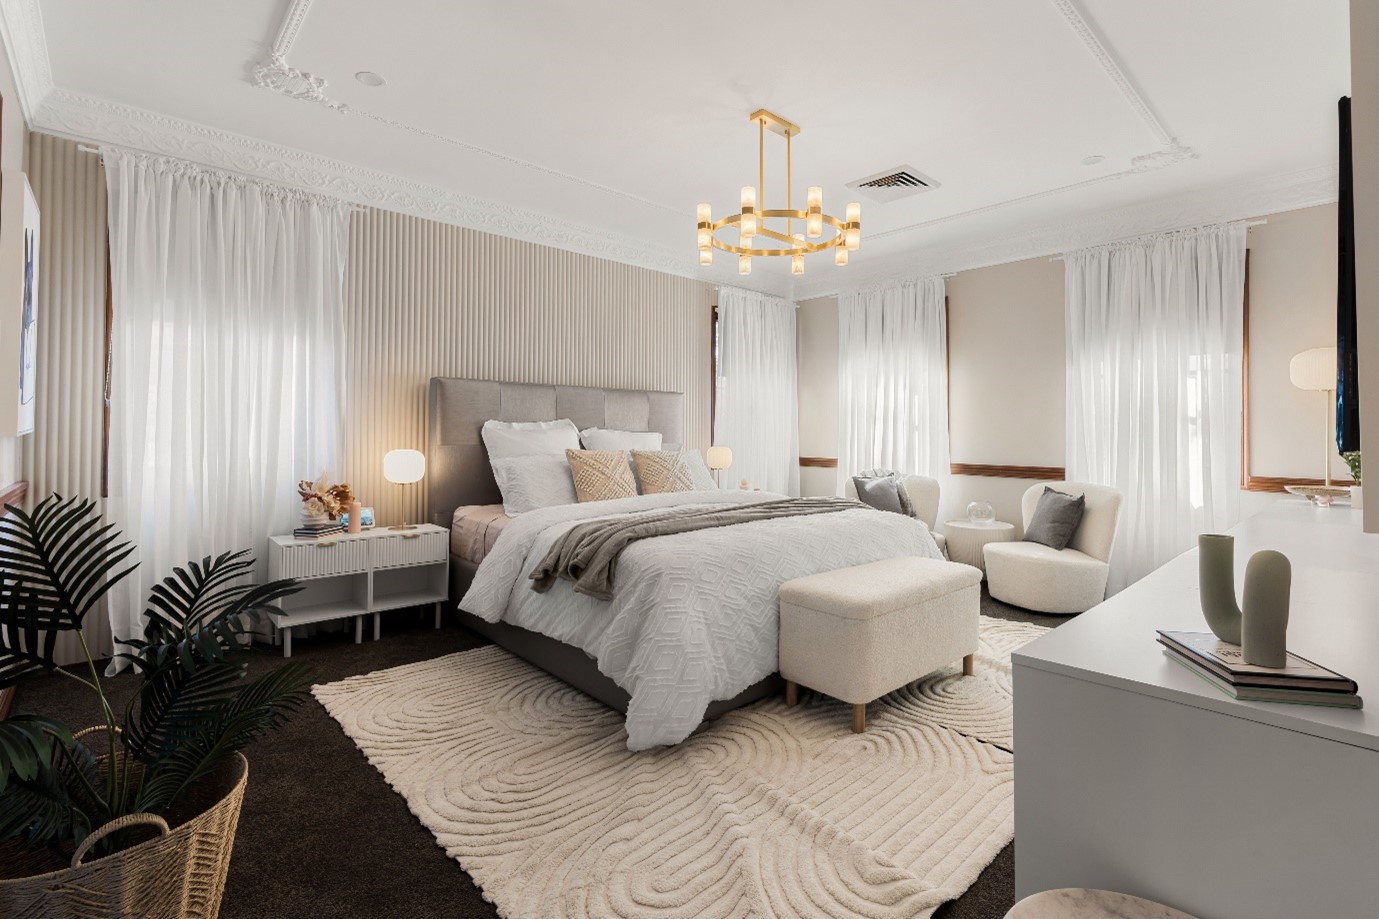
Let’s look at the lighting … every room (even bedrooms) deserve something nice to look at & in this room, it’s definitely that big statement feature light from Beacon Lighting. Made of brass & Spanish alabaster glass, it’s a very luxurious (& expensive) addition to the room but one that packs a real punch.
As for practical storage, a row of Kmart’s Alfie 3 Drawer Units were screwed together that now give no reason for fold up clothes to ever be scattered on the floor again. I topped it off with a TV overhead, just for those lazy days when you want to snuggle up under the doona & watch TV in bed. New bed linen & furniture from Kmart nicely finish off the room & you’ll see we braced 2 of the Alfie bedside tables together, on each side of the room to create a much larger bedside table to suit the larger proportions of the room. Cute artwork prints from Urban Road finish the room off.
All up, the full retail cost of renovating these two rooms came in at $31,563.00. Of this, $10,940 went to all trade labour invoices at normal market rates & $20,623 for the purchase of all construction materials, fixtures & fittings and property styling items.
Broken down a little further (as I know many of you love to know these details 😉), the purchase of all cabinetry, wall panelling, benchtops, etc & all carpentry labour was roughly $11,211, paint & painting labour $4,457, all the new lighting & electrical labour $6,051, new carpet $1,594, curtains, curtain tracks & installation $4,500, rubbish removal $750 & property styling items at $3,000.
What the actual cost of this renovation does show is the significant rise in the cost of materials (versus labour) in the post covid world where materials have virtually doubled in price. As renovators, it’s more important than ever to shop around & compare prices on all your materials, fixtures & fittings. If you’re disciplined enough to do so, you can really stretch your reno budget so much further.
As always, if you have any questions on this renovation, be sure to ask them in the comments box below & my team or I will answer them promptly for you.
Until next time,
Cherie x


Love your work. Both rooms look way better, however I have a couple of points:
* Unless both rooms have aircon, removing the fans would mean both rooms have no cooling.
* Using orange in the family room just makes the brick wall more overpowering. I would’ve used white on the new doors and behind the TV and used grey (a colour which also appears in the brick wall) as an accent colour.
* Using sheers does not provide privacy at night! It would’ve been better to have had day/night blinds on the windows, which provide privacy during the day and night.
Glad you love Cherie’s work Laura. Yes, very valid comments. The house had ducted air con throughout so ceiling fans weren’t a necessity. As you know, design is a very subjective thing & the way one person may renovate a space, can differ wildly to the next. There is no right or wrong way. Cherie liked the brick wall (as did the homeowners) therefore worked the room to bring that wall out more as a feature. Cherie also wanted curtains not blinds in the room to add more softness to the room, hence the semi-sheer curtains. As the after photos show, they curtains are not super sheer curtains, so they still allow light to stream into the room during the day & still provide good privacy at night, although not 100% blockout which wasn’t required for this room. Hope that explains & thank you for sharing your thoughts on our blog which we appreciate. Cherie Crew x