


7 Ways To Use Flat Pack Cabinetry In Your Home
Hi,
You’re only limited by your imagination when it comes to all the practical & easy ways you can use flat pack cabinetry in your home. In this blog, I’m zoning in on the Kaboodle brand of flat pack cabinetry which I’ve been actively using for quite a few years now. Just drive into your local Bunnings store, pick it up & away you go!
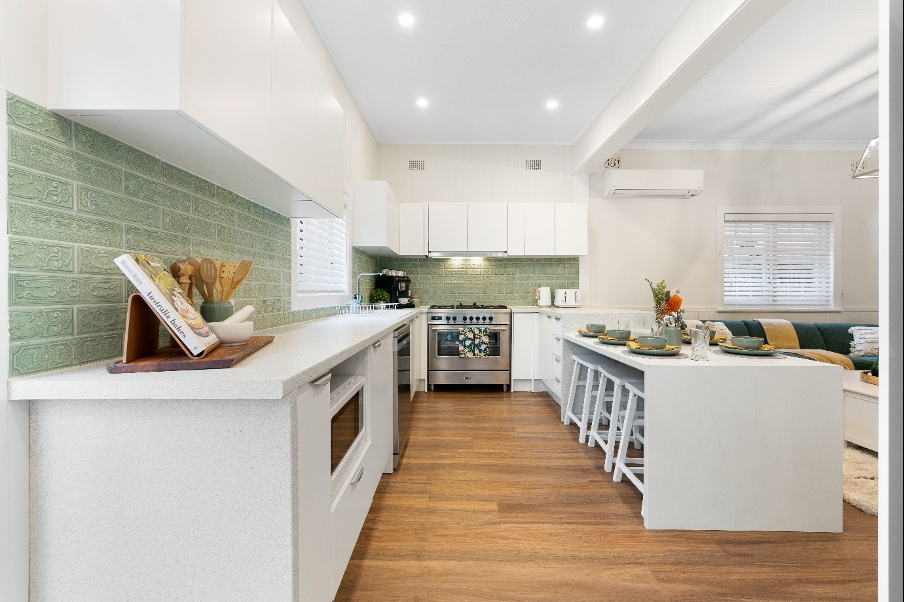
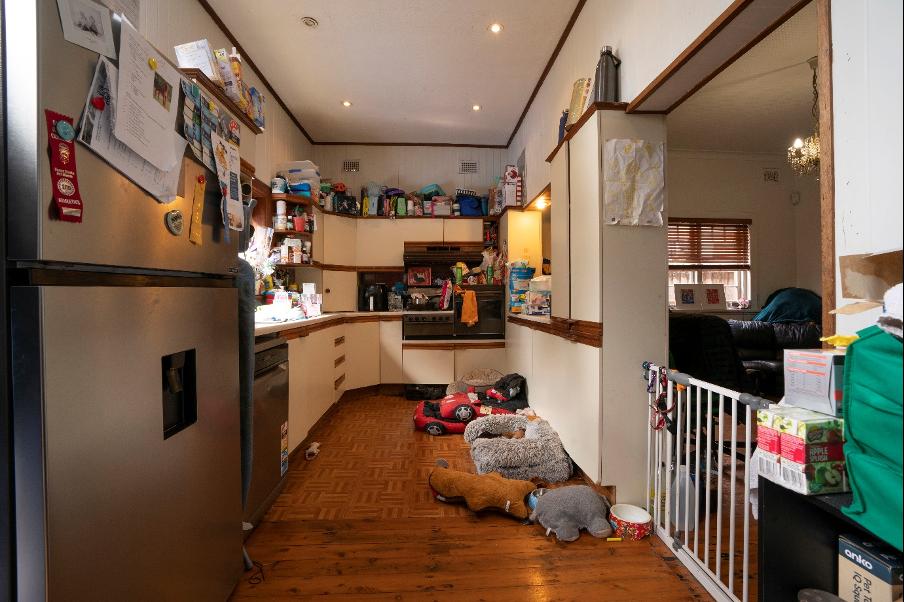
THE KITCHEN
The Problem:
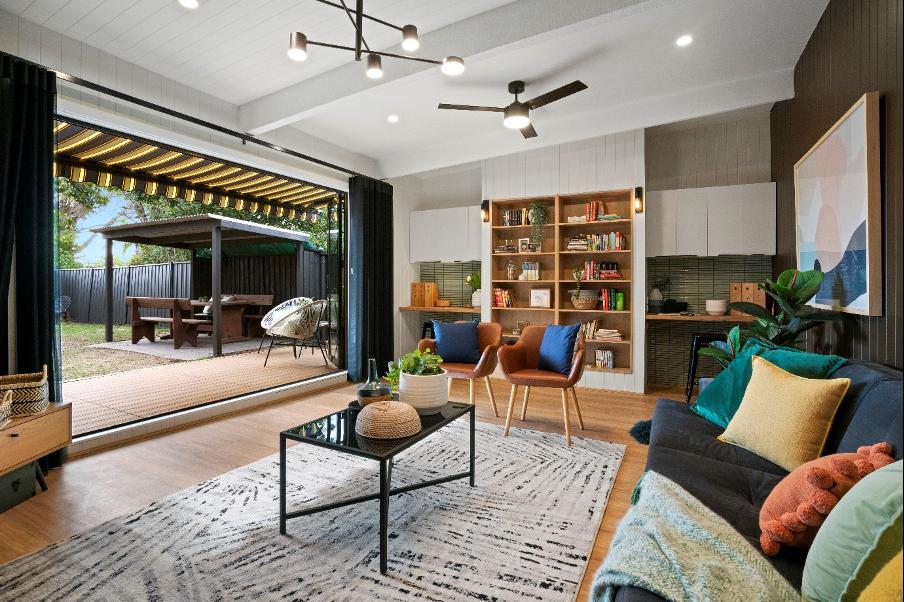
This old kitchen not only looked dated & drab, but the wall between the kitchen & lounge room, visually split the two rooms in half, making the spaces appear smaller & disconnected. There was also no space in the two rooms, for a dedicated dining area, making family meal time an impossibility.
The Solution:
The removal of the structural wall was the biggest change in this room, instantly creating an open plan space that homeowners love. Removing all the old cabinets & installing off-the-shelf cabinets not only provides heaps of practical storage, but the lighter colour scheme creates an amazing sense of space.
A built-in dining table made from laminate benchtops (deliberately sunk down at a comfortable seating height), not only makes the kitchen look larger (adding more value to the property), but now makes family meals together, a breeze.

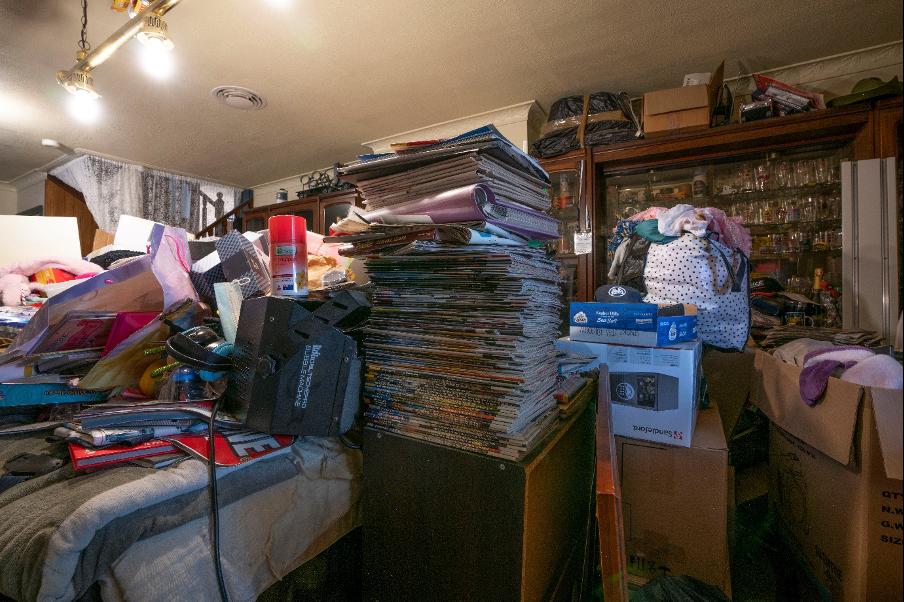
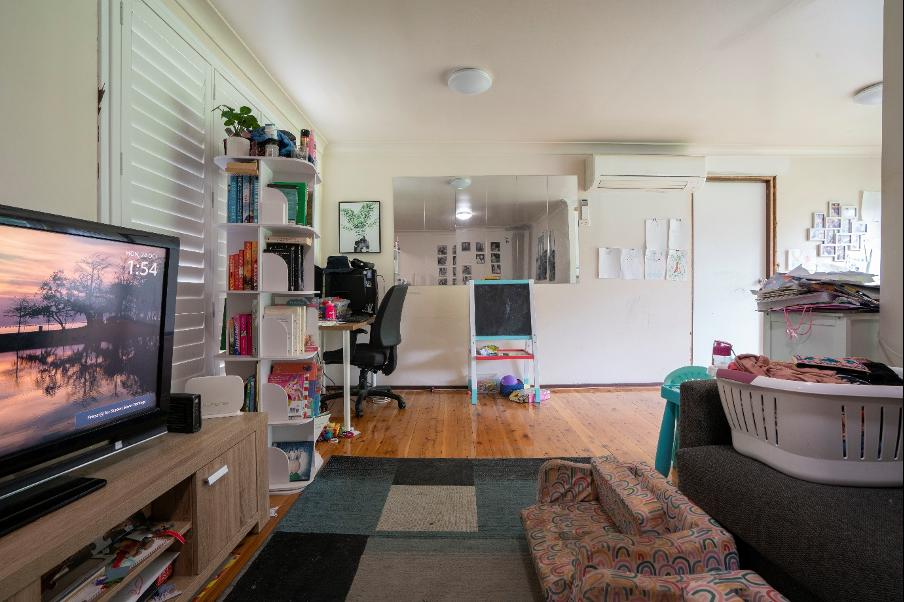
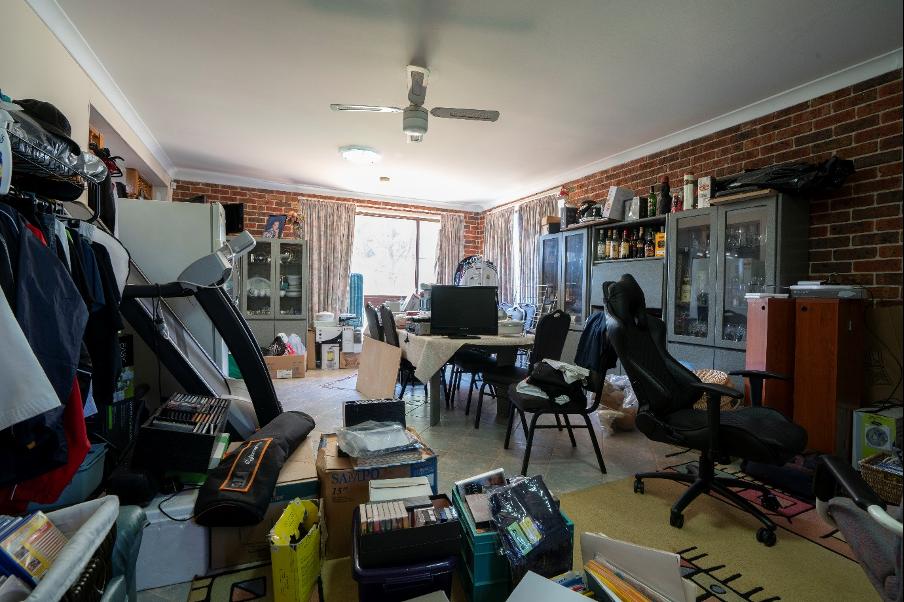
THE RUMPUS ROOM
The Problem:
The clutter in this family room made it extremely difficult to physically move around in, let alone be a practical room anyone could use. A lack of storage cabinets meant nothing had a home, resulting in everything being stacked on top of each other & visually unattractive.
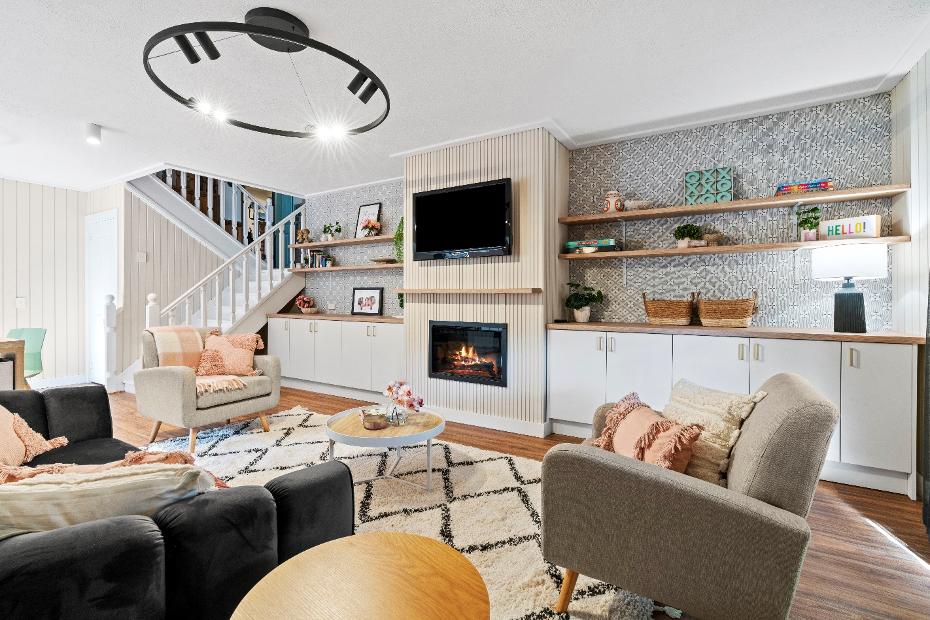
The Solution:
This home desperately needed a smart storage solution where items could be hidden behind closed doors to free up floor space for a relaxing family area. A 9-metre wall of Kaboodle’s base cabinets were installed in Modern Profile in the colour white, that now house everything within easy reach but out of view.
Kaboodle Oak benchtops were installed on top & even the overhead shelves are a Kaboodle benchtop cut in half. A gorgeous electric fireplace takes centre stage in the room & stylish new furniture & lighting help create a family friendly area where everyone can come together.
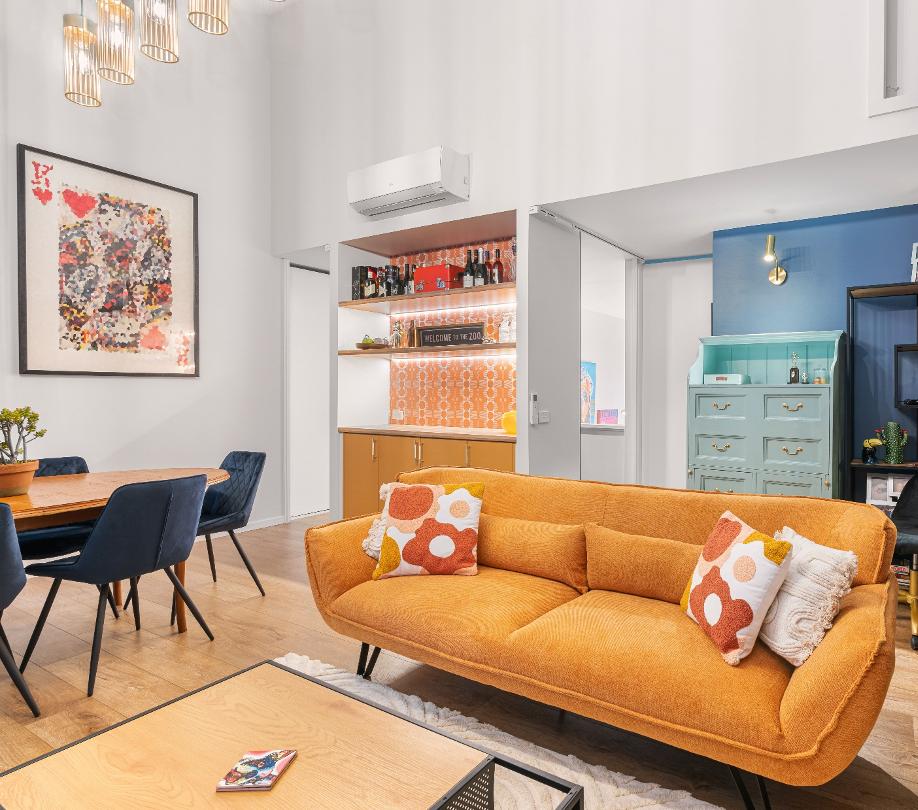
THE BAR
The Problem:
This family love to entertain but one section of their lounge room wall wasn’t being put to its best use. With nowhere to store any of their alcohol, glasses & other bits & pieces, a smarter storage solution was high on the family’s list of priorities.

The Solution:
The plan of attack was to utilise all the space within this wall nook to maximise the amount of available storage. Kaboodle’s ‘Paint Your Own Door’ range was installed for the base cabinets then painted in a vivid orange colour to match the modern mid-century interiors. A Kaboodle Hickory Maple benchtop was installed & the overhead shelves cut out of the same material for continuity. A retro inspired wallpaper was added in for contrast & the LED strip lighting makes the whole space come alive.
THE STORAGE NOOK
The Problem:
This young family of 4 lived in a basic home that lacked its own personality. Space wasn’t utilised effectively & a very haphazard arrangement of furniture made the room look boring & bland. High on their wish list was a nature inspired home to help them all relax, at the end of each day.
The Solution:
Those gorgeous hardwood floors became the inspiration in this family room so timber panelling was run up the walls, combined with the colours you naturally find in nature. Kaboodle’s ‘Paint Your Own Door’ range was installed for the base cabinets, then painted in a soft green colour (try Frenchic’s “Scotch Mist” colour).
Kaboodle’s ‘Crack Crush’ gloss benchtop was then installed on top, that acts as a base for the flatpack bookshelves overhead. The wall behind was painted in a dark charcoal colour (try Frenchic’s “Smudge” wall colour) that adds contrast to the room. The end result is an effective desk, storage & display wall, built entirely out of off-the-shelf, flatpack cabinetry.
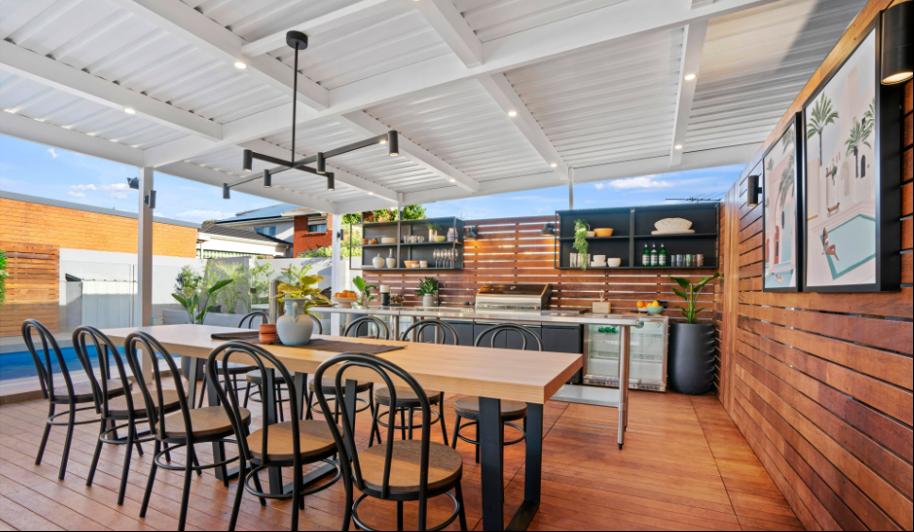
THE OUTDOOR BBQ AREA
The Problem:
This outdoor patio area was hardly the sort of place you’d invite your friends around to, for a BBQ on the weekend! Being a Greek nationality family who love to cook, this space needed a major overhaul fast.
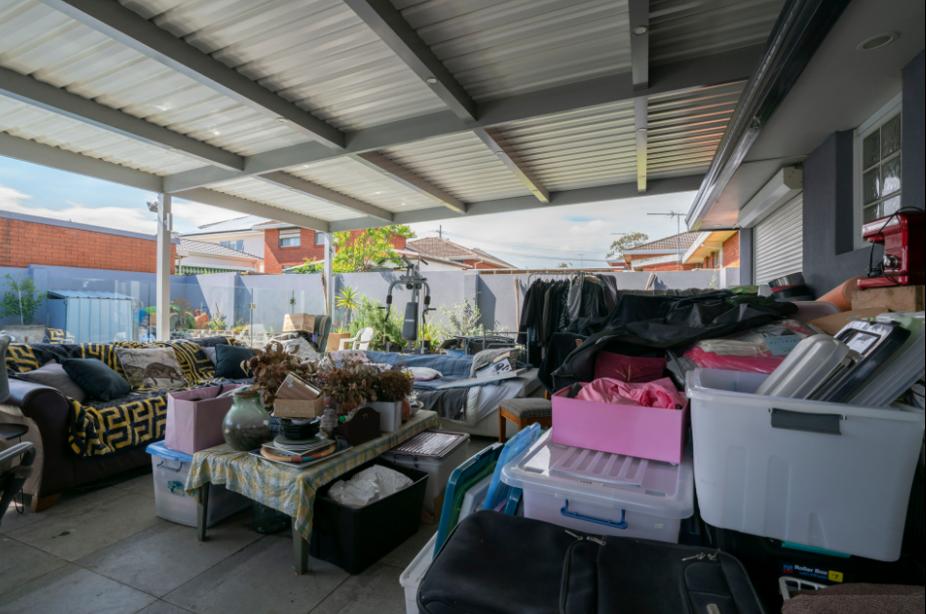
The Solution:
The installation of a big outdoor BBQ & kitchen area, as well as a 10-seater dining area were the keys to success in this outdoor entertaining area. Kaboodle’s 900m Steel Wall Frame shelves in black were installed over the outdoor kitchen area, providing a practical place for plates, glasses & decorator items to be stored, within easy practical reach of the BBQ itself. The addition of the timber decking & walls adds real warmth to the space.
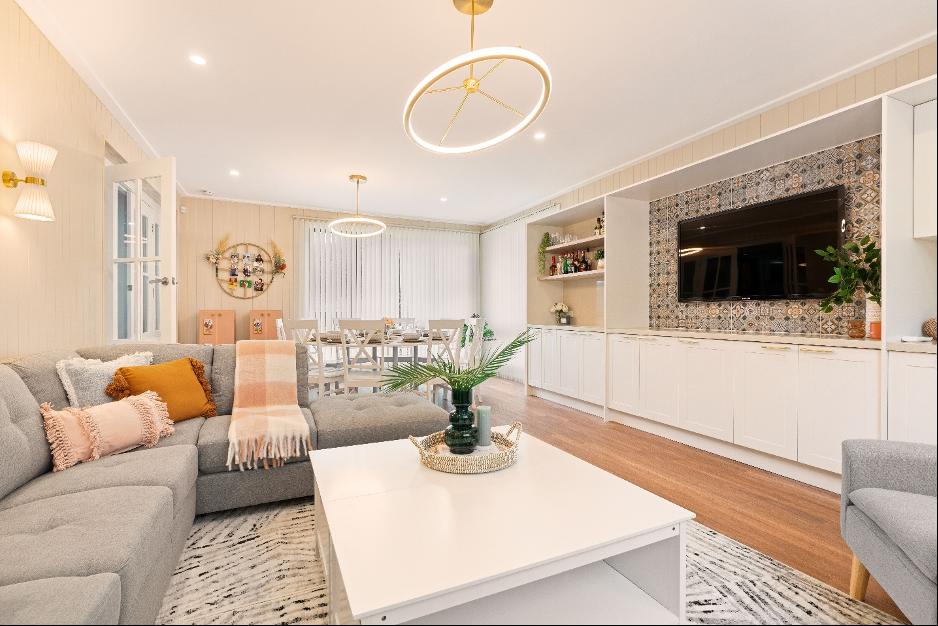
THE FAMILY ROOM
The Problem:
This large family room had good structural bones but those red bricks walls, dated floor tiles & poor lighting, made the room look older than it was. With Italian & Spanish homeowners who value big family gatherings, they wanted a space they could proud of & one more conducive to big social get togethers.
The Solution:
So many updates took place in this room – VJ panelling added to the walls, new floating floorboards, paint & lighting throughout but the hero in this large room is the massive storage & display wall, crafted entirely out of Kaboodle’s Antique white flatpack cabinetry. The addition of Italian themed tiles behind the TV area honours the family’s heritage whilst also providing oodles of practical storage.
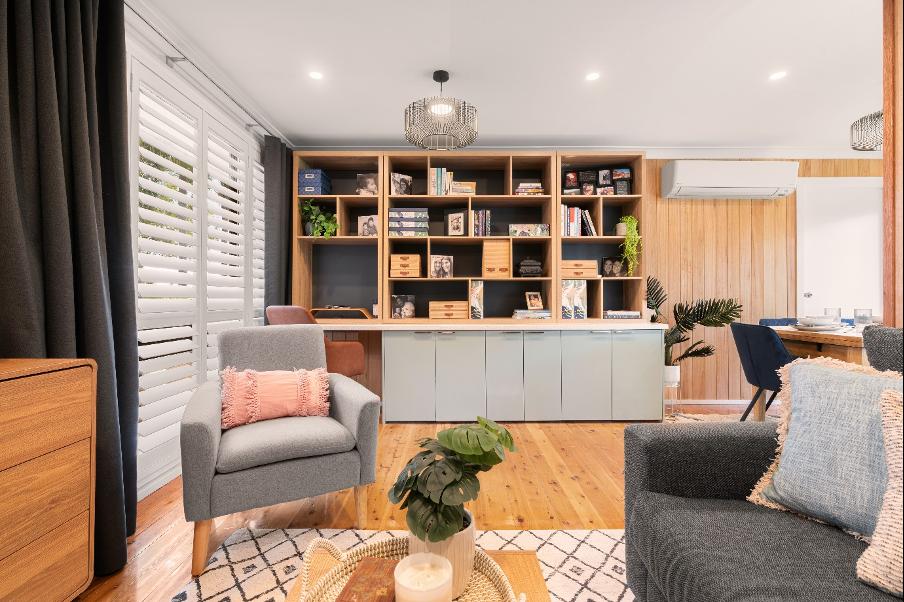
THE HOME OFFICE
The Problem:
The owners of this home were fortunate to have two garages on their property, one which became nothing more than a dumping ground for random stuff they’d collected over time. With the family’s desire to have a 2nd living area & more space for their teenage daughters to study, it was the perfect time to reinvent this room for a higher & better use.
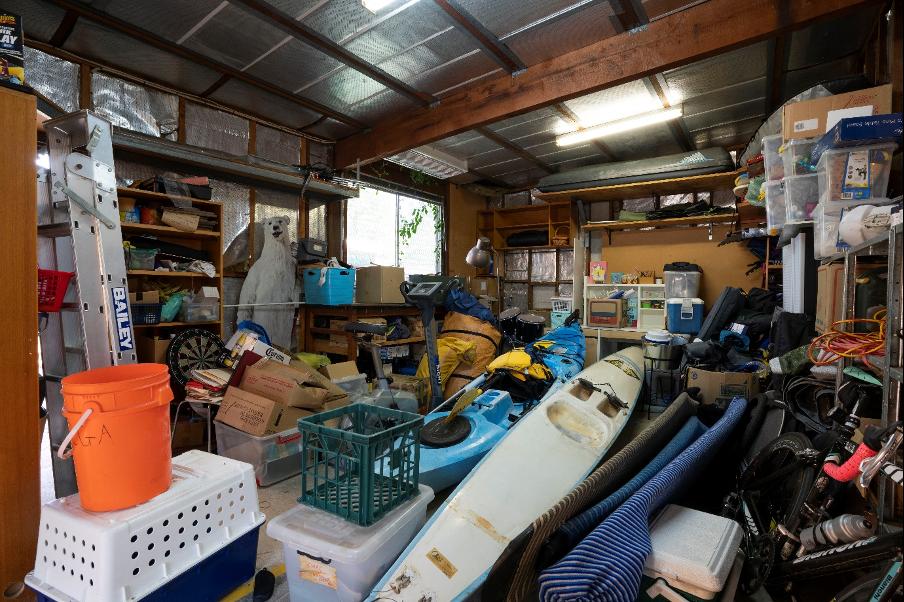
The Solution:
This old garage was emptied & hybrid flooring installed to create a solid base under anyone’s foot. The walls & ceiling were cloaked in VJ wall panelling & a large bifold window installed that connects the garage to the back yard & lets mountains of natural light stream in.
Off-the-shelf cabinets serve as a central bookcase & Kaboodle’s wall cabinets & benchtops create 2 small workspaces for each daughter to sit & study at. Colourful new furniture brings the whole space to life.
As you can see, it’s easy to create the look of bespoke storage when you get a little creative with flat pack cabinetry. If this blog has inspired you to think about the possibilities within your own home, be sure to check out my Home SuperSaver membership. When you join the group & open a Bunnings PowerPass account, you’ll be able to access a substantial discount off many of the Kaboodle items stocked through Bunnings. CLICK HERE to join now.
As always, would love to hear your comments.
Much Love,
Cherie x


Brilliant back deck design
Thanks Steph! Really glad you loved my deck reno. It was a fun one. CB x
Brilliantly designed back deck
Cherie. Well done.
Thanks so much Steph. Cherie Crew x
Fabulous use of space! So well done.
Thank you Ann. Cherie Crew x
All awesome .Great results
Thank you Yvonne. Glad you liked the before & afters. Cherie x
Cheri,
Have watched you for years. Love your work. You are simply a magician with renos! Super!
Thank you so much Lolly. So very nice of you to take the time to write in to tell me this, much appreciated. Cherie xx
Looks amazing! Would love to hear the budget for each room.
Hi Tanya, so sorry but I cant publish the budget for each of the individual areas shown in this blog as the images I’ve featured were all part of a bigger house reno & it would take me hours & hours to go back through & calculate all the individual costs for each storage item. Saying that, over the last 6 months, I have been publishing blogs on all my renos with costs included so just read through some of those blogs I’ve already published over the last 6 months. I have another blog going out in about 2 weeks time which has the costs included. CB x
I am amazed all those rooms are done with flat pack, they look amazing
I’d love to see a laundry renovation if you have one
Hi Deborah, really glad you loved the article. I’ll publish a laundry before & after on my facebook page for you this coming week. If you haven’t yet joined my page, join http://www.facebook.com/renoforprofit and you’ll see the post there, which used flat pack cabinetry. CB x
This info is worth everyone’s attention. How can I find out more?
Hi Andrea, thank you. Just follow our blogs and you’ll be kept up to date with all the renovation content & tips we publish. Cherie Crew x
Excellent work, Cherie – every room has gone from drab to fab. I am facing a similar situation to the kitchen above with structural wall about 5m long between kitchen and dining. Are we talking tens of 1000s to do what you did with the wall or far less (80s house, brick veneer)?
Hi Janene, unfortunately, removing structural walls does cost many thousands of dollars. The longer the wall to be removed, the more expense. Firstly, you’ll need a structural engineer to do you a structural engineering / beam plan which normally costs about $2K. Then you’ll need planning approval through council or a private certifier which you should allocate $1K to $2K for. Then you need to buy the beam & the price will vary depending on whether you need to install a laminated or steal beam & whether you need 1 or 2 beams. Allocate $2K in your budget for a beam. Then carpentry labour or a builder to install which can cost anywhere from $5K upwards, depending on how much other work needs to happen like patching the ceiling, painting etc. Generally, to remove a big 5 metre structural wall, you’ll be looking at around $10K & depending on who you get to do the job, could go even higher. It will make a massive difference to your house but is definately a bigger expense to incur but well worth it, in terms of adding value to your home. Hope this helps. CB x
Love your work and inspiration. Thank you.
Thank you very much Anne! CB x
Thank you for sharing the different rooms and solutions. What do you think of the height of cupboards, sometimes I feel they look like kitchen cabinets and am not sure to use the for this particular reason. I need two cupboards and shelving as have recessed space on either side of a fireplace.
Hi Cherie
I love your amazing Reno’s
Q. I wanting to remove my tired looking laminated kitchen cupboard doors and painting them.would you recommend doing that or putting new doors on instead?
Hi Lynne, if the cupboards are in good condition there is no reason why you can’t refresh them with laminate paint. This is a much cheaper alternative to replacing them. Cherie Crew x