


From Dungeon To Designer
Howdy,
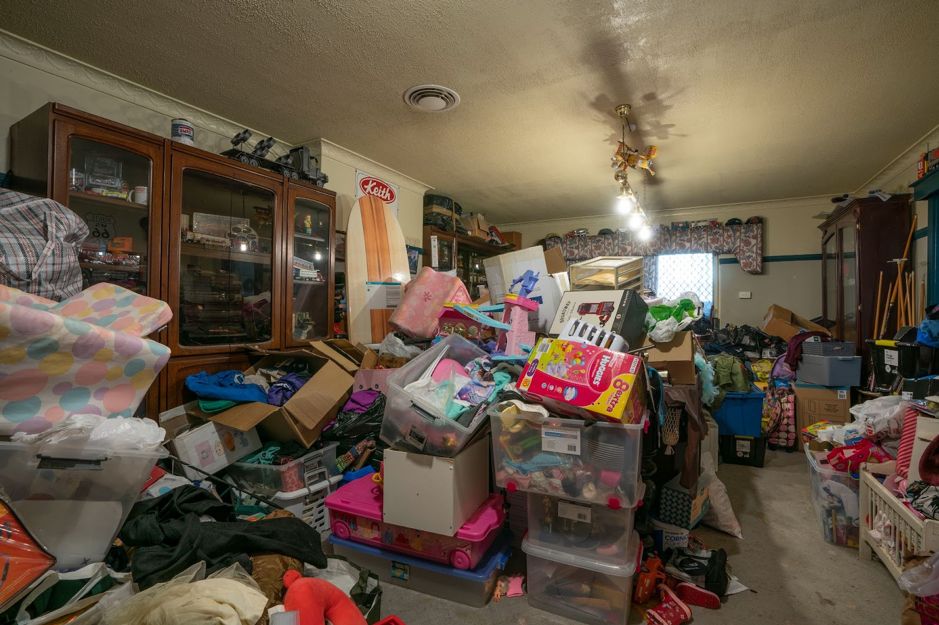
The second episode of Channel 9’s Space Invaders aired last night, and for those who missed it, I was tasked with the job of converting a grungy, uninspiring downstairs rumpus room into a practical & useable space for single mum Jill & her 2 daughters (both on the autism spectrum) to enjoy.
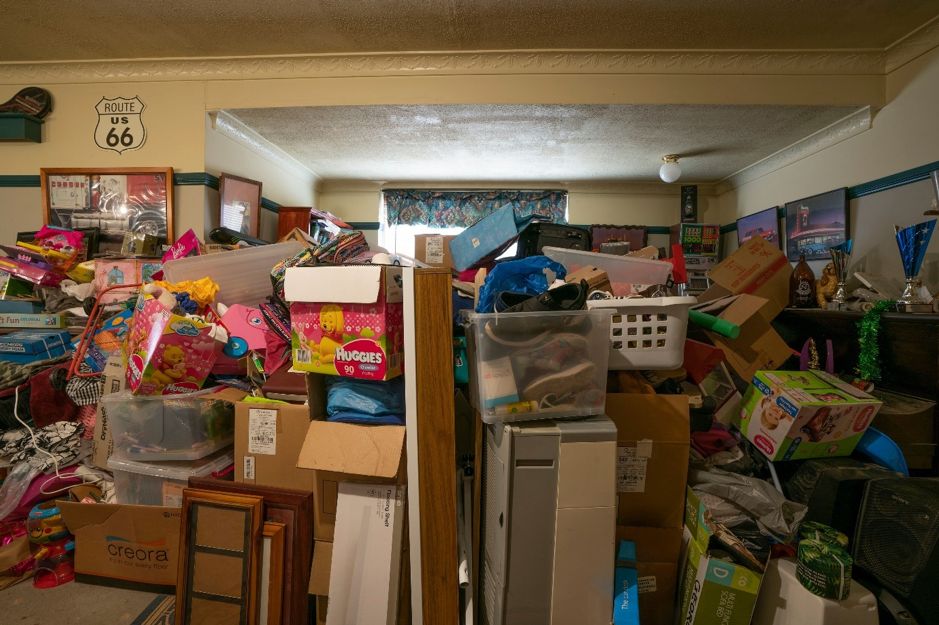
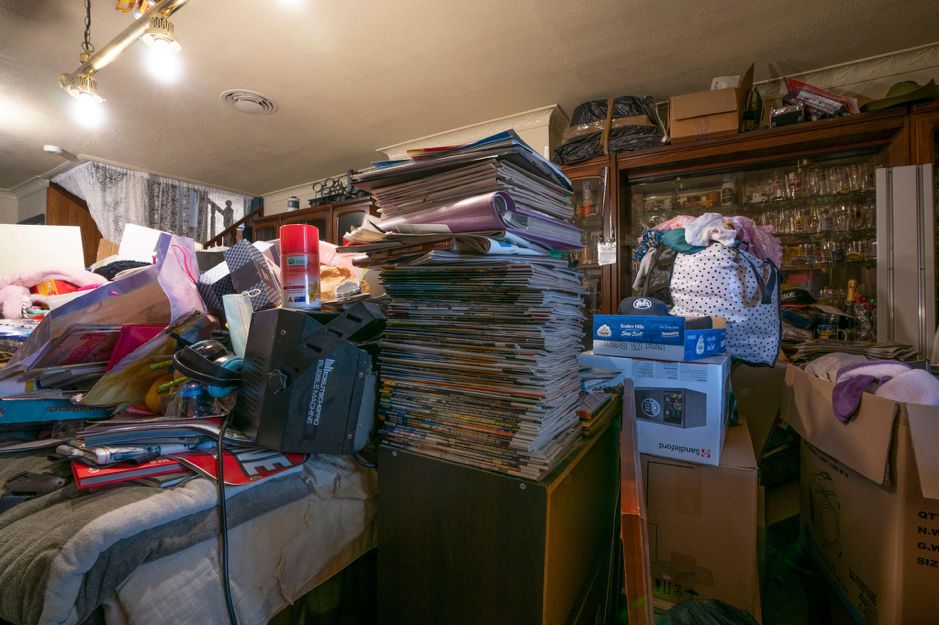
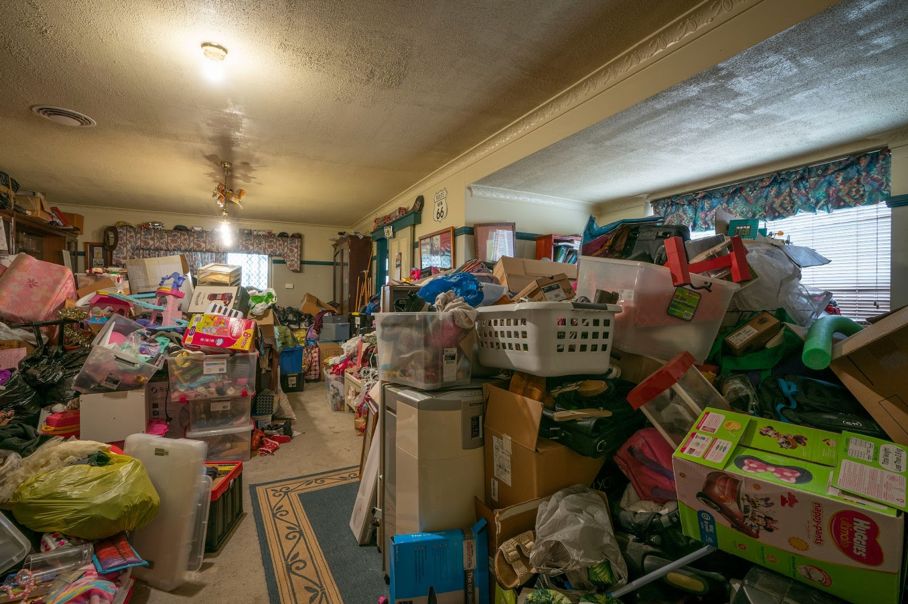
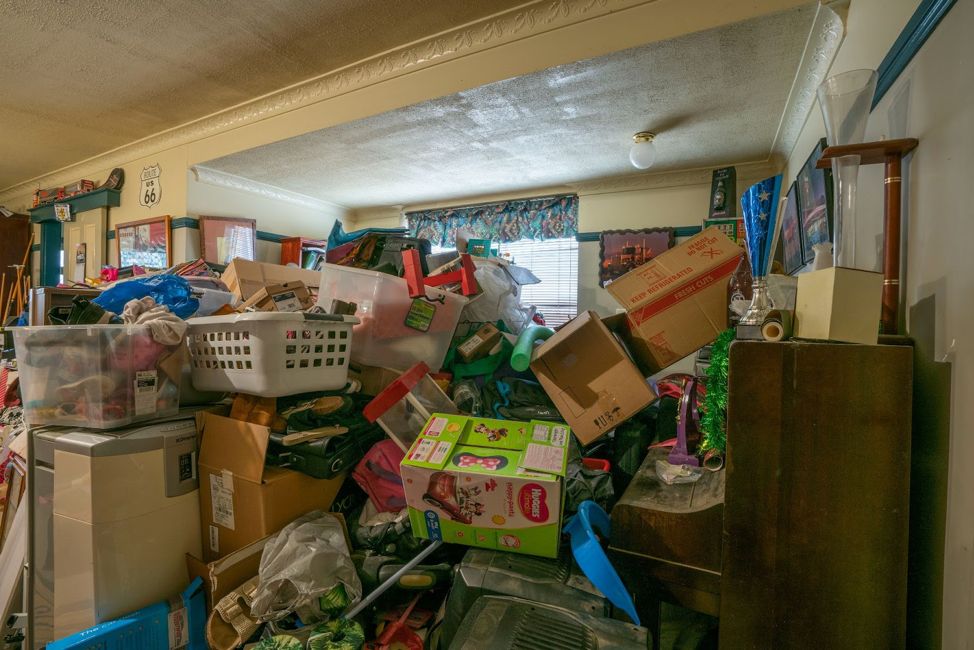
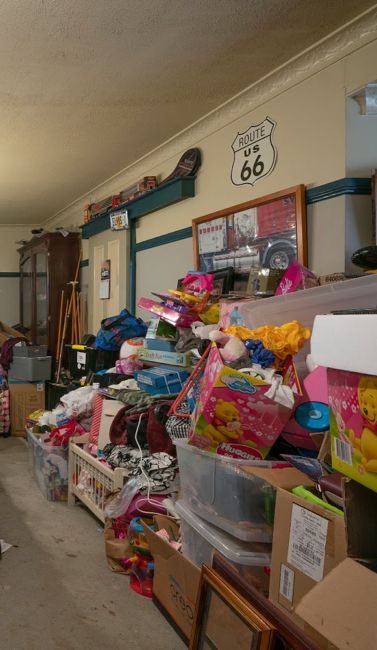
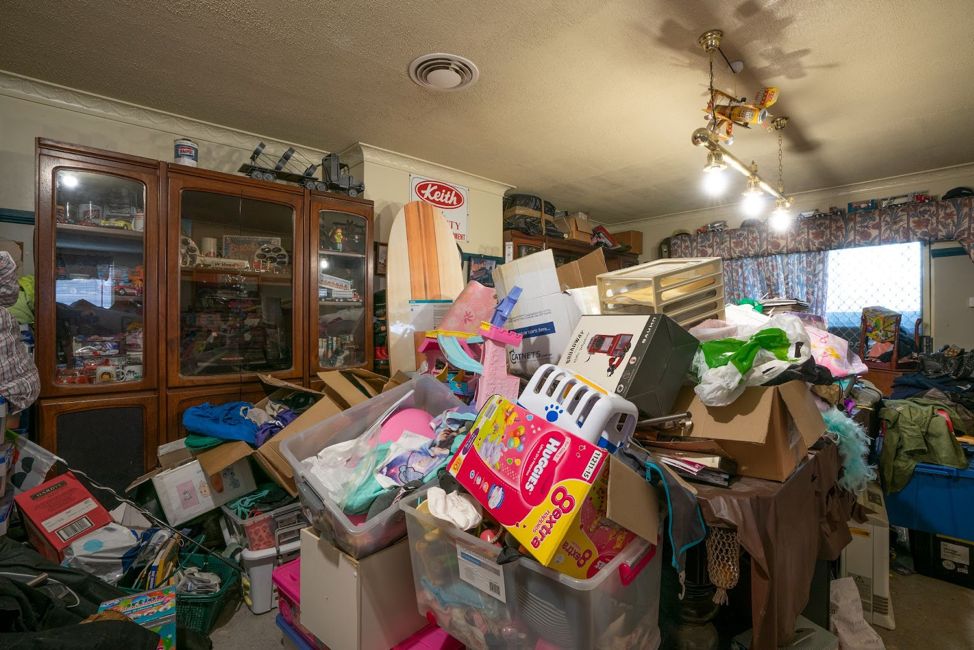
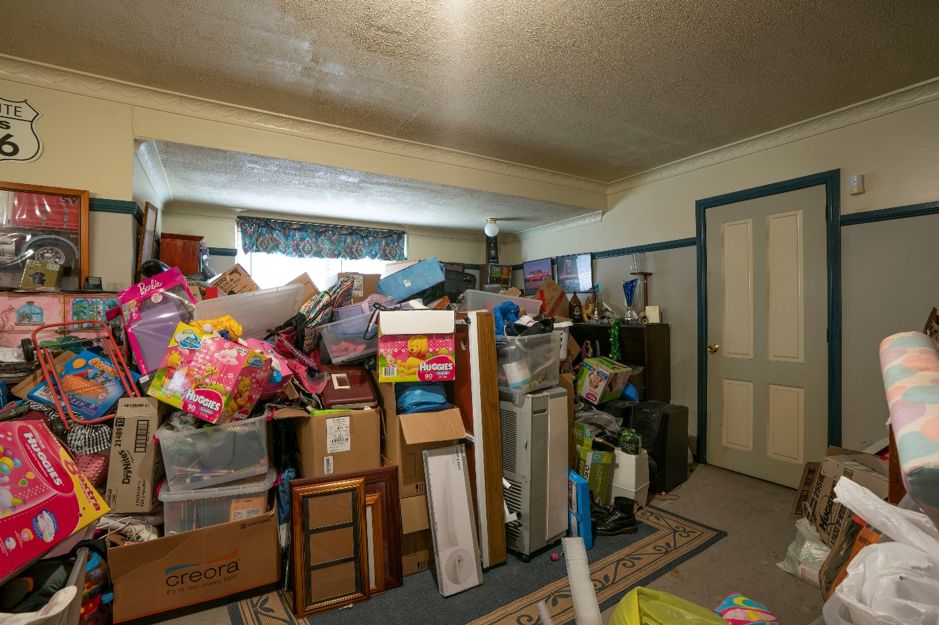
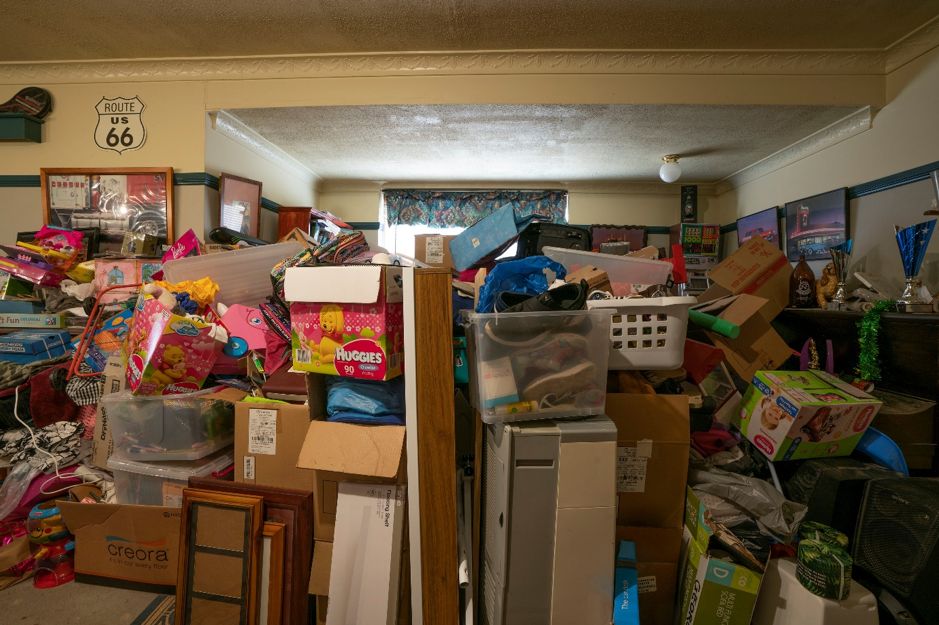
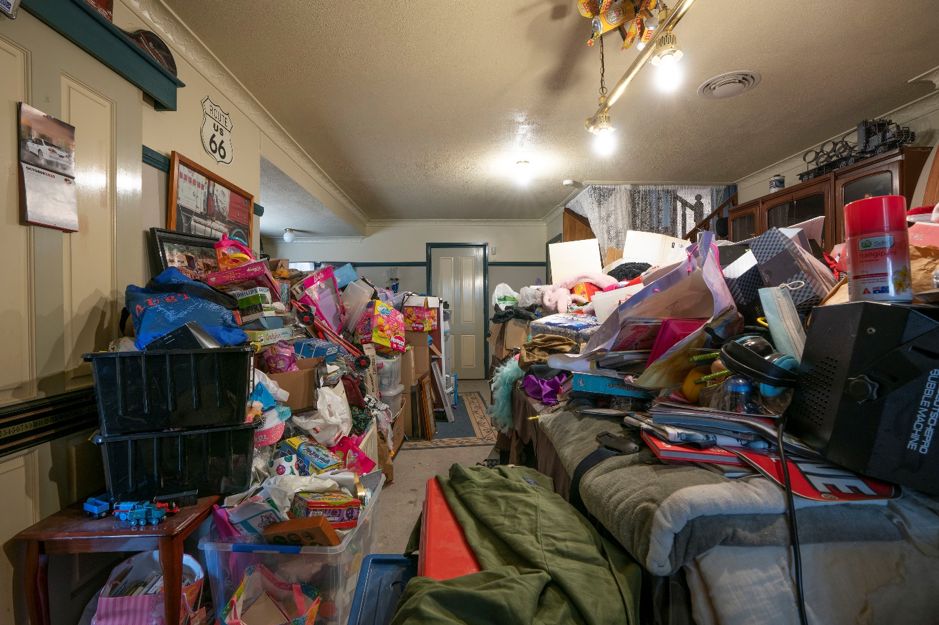
Having a spare room in your home can be either a godsend or a curse, depending on how you use the room. In Jill’s case, it had become a dumping ground for all sorts of weird & wonderful stuff – kid’s toys, furniture, bric-a-brac & a lot of her former husband’s belongings which hadn’t yet been removed from the home. The result? A room that was completely unusable, dark, dowdy & drab.
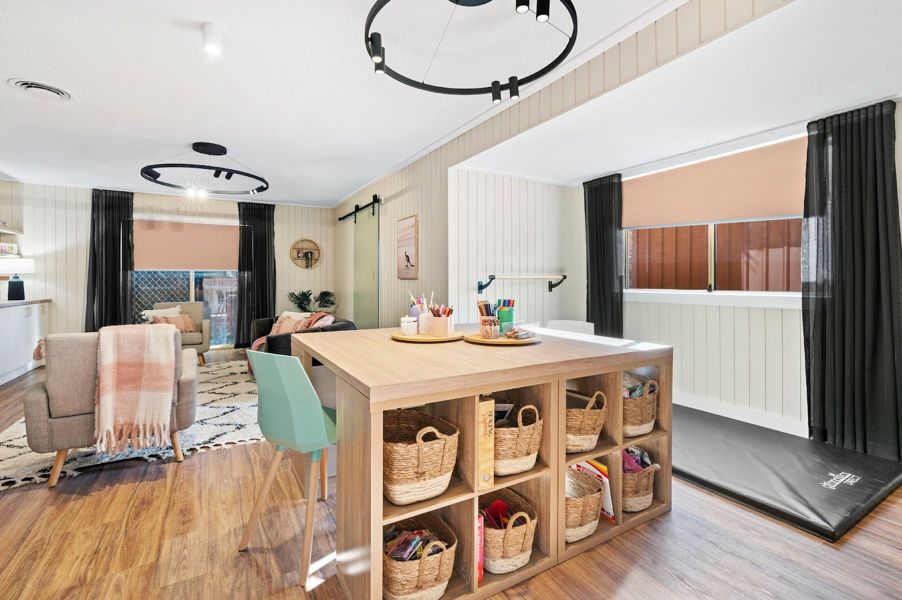
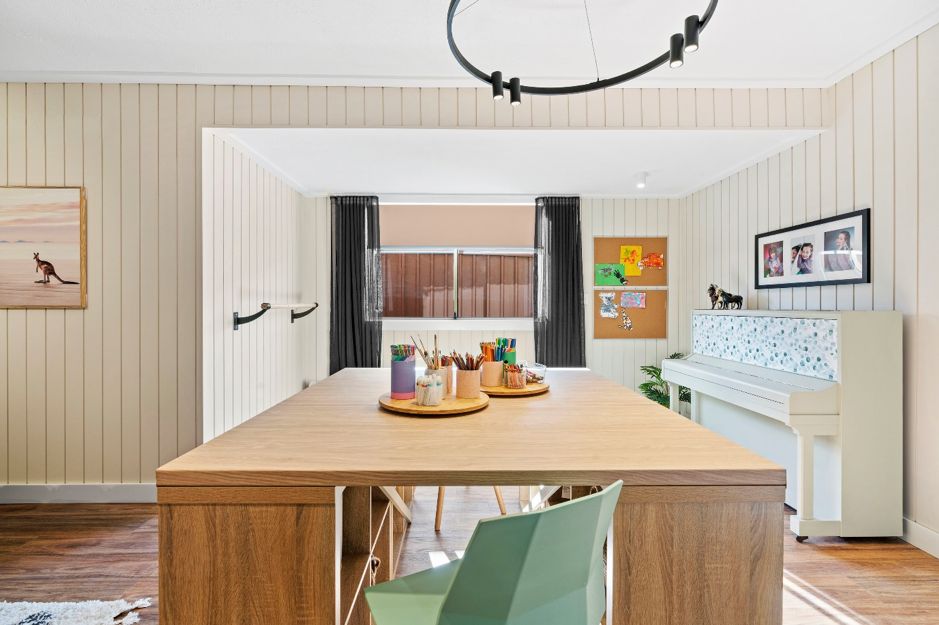
Whilst Jill & the girls have their own bedrooms & there was a living room upstairs, this small family of 3 wanted a relaxing space where they could all come together in the one room, but still have enough space where they could do their own, individual activities. For train driver mum Jill, that simply meant a place to sit & unwind in front of a fire & TV at the end of each day. For the 2 girls, an arts & crafts area to pursue creative activities, music area & the youngest Ruby needing an autism exercise space.
If we look at what my brief essentially was – it was to turn this dungeon-like room into a relaxation zone, arts, craft, music zone & exercise area, all rolled into the one room. Far out! Add to that, the extra complication of having to create substantially more storage in the room for all the items to be neatly tucked away behind closed doors, that the family were keeping. Did I forget to mention … there’s a piano buried under all that clutter & barely noticeable in the before photos. Instructions from the homeowners: it has to stay!
WHERE TO START
In every renovation for Space Invaders, the first task is to box all the clutter up & take it to a nearby hall for the brilliantly talented, Peter Walsh to work his magic. All up, 227 boxes came out of this one single room. Mind-blowing but true! Whilst everything was being packed up, the lovely Angie Kent rummaged through the clutter to find treasures or anything that could be potentially upcycled. Once the room was emptied, I set to work, assessing the full size & scale of the room (roughly 8 metres long x 4 metres wide & 5.8m wide in the alcove area), its condition & any obtrusions I had to deal with.
With the room now emptied, the first thing that hit me was the old carpet – dirty & well past its use by date. The smartest way to make this room appear larger was to ditch the carpet & install floating floorboards instead. Being a lower floor level, I wanted a water resistant hybrid floorboard so naturally choose the Merseyside Classic range from Flooring Xtra in Spotted Gum colour.
Now, let’s turn our attention to that hideous ceiling. Textured concrete may have been at the height of fashion in the 1970’s but it ain’t that great now. Together with the patterned cornice, it really makes the room scream “renovate me”. I got my carpenters to remove the patterned cornice however this took WAY longer than expected. What should have ordinarily been a 30-minute job, turned into a 5-hour, filthy task, thanks to those cornices wanting to stay put. Straight off the bat, my construction schedule blew out by more than half a day & when you’ve only got 2 long days to renovate & style the space, that puts pressure on everyone involved. Some things in renovating you just can’t predict but we soldiered on in good spirits …
CEILING CONUMDRUMS
With the cornices now finally off, it was time to install 92mm x 18mm treated pine, laid flat against the ceiling, to where the old cornices used to be. This is a more modern day take on the traditional cove style cornices. The textured concrete ceiling had to stay & together with the new cornices, were painted in 2 coats of Taubmans Endure Ceiling paint in standard white. Just painting the ceiling & cornices instantly made the room look sooooo much better.


WONDERFUL WALLS
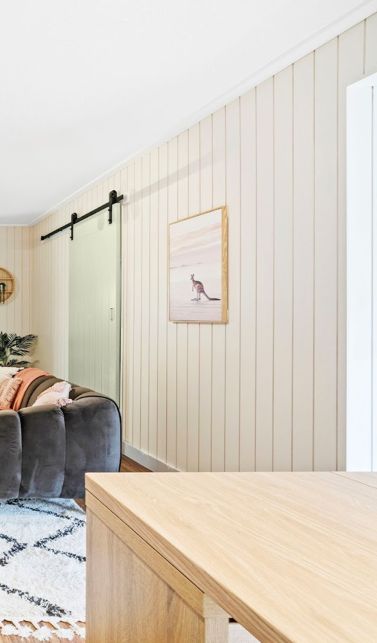
The walls in this room were thankfully in decent condition, albeit, just a little bit bare. I could have easily just painted them all up but I wanted the room to look more visually interesting by adding more texture to it. We removed the green picture rail running all around the room as it was a strange addition for a home that wasn’t heritage in any way. We then installed one of my favourite go-to-products, VJ wall cladding to most of the walls. That meant the walls had to have timber battens installed first which becomes a more difficult job when you’re screwing those into concrete walls. This took 2 carpenters one whole day to complete but was definitely worth it.
New skirting boards & architraves were installed over the top of the VJ wall cladding & a new barn door added to replace the old, standard laundry door that was in the room previously. Once all the timber work was complete, my painters jumped straight in, painting the walls in the beautiful calming colour of Taubmans Beige Drop which contrasts nicely with the Taubmans Crisp White trims everywhere else.

STREAMLINED STORAGE
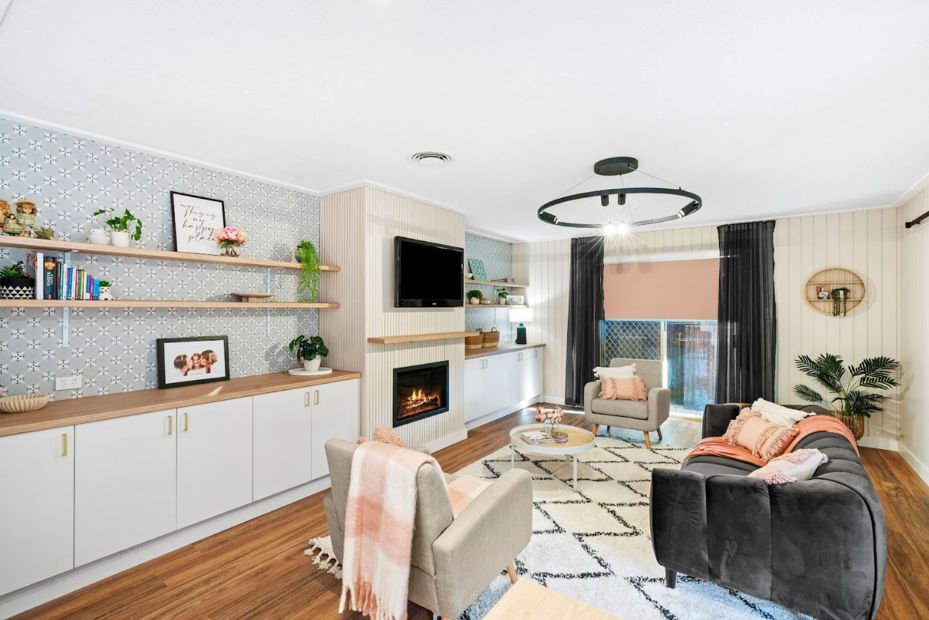
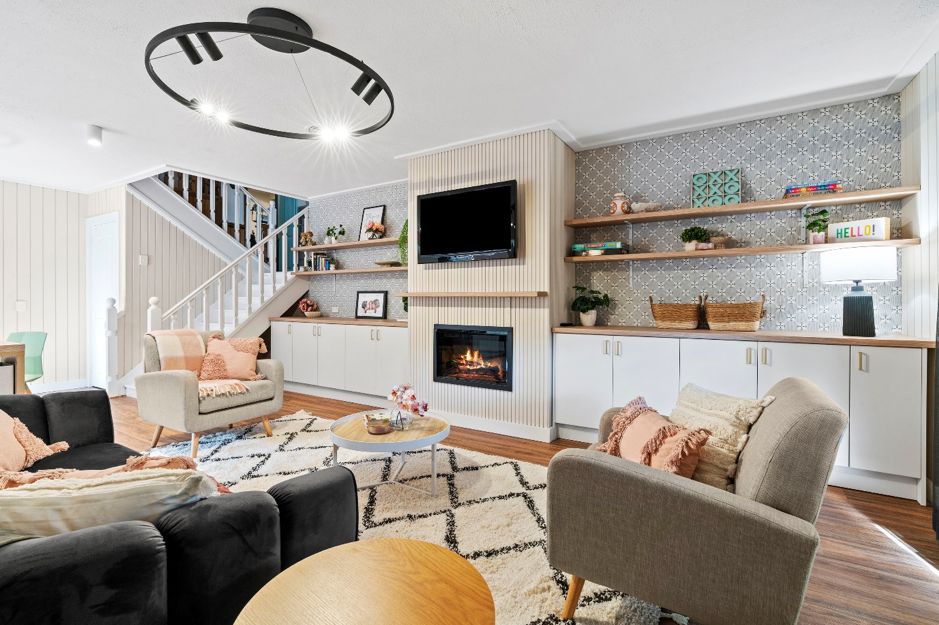
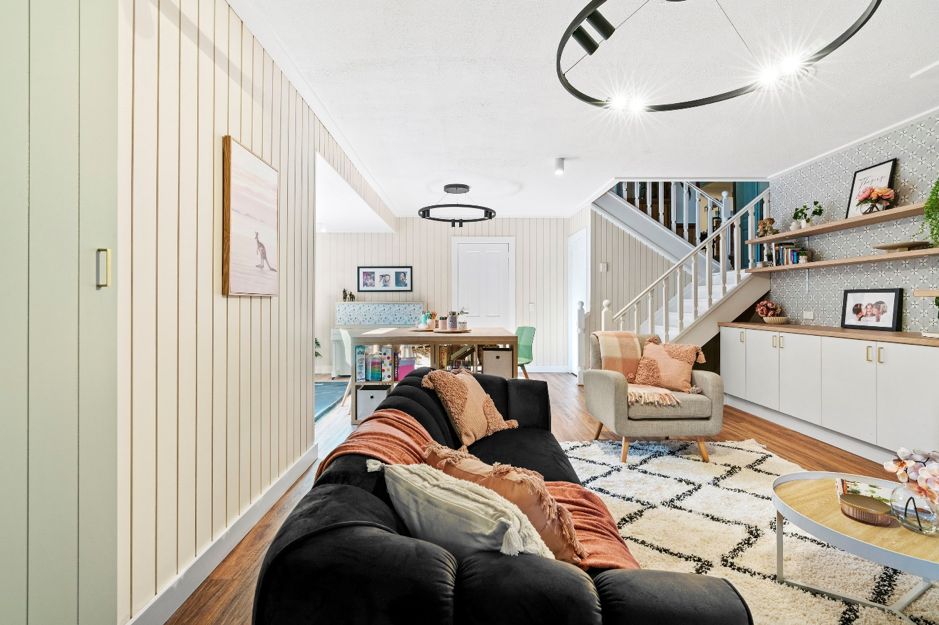
Like every Space Invaders renovation, the most important thing is the addition of new storage options. With window & door obtrusions scattered everywhere & the room being only 4.1 metres in depth, I decided it was best to install storage cabinets on one wall only, to free up as much floor space as possible. With only 2 days to do this renovation, the luxury of custom-built cabinetry wasn’t an option or even needed. Instead, I used Kaboodle ready-made cabinets, straight off the shelf from Bunnings to create the look of bespoke built-ins.(Remember: if you join my Home SuperSaver group, you’ll get a big discount off these). The simple addition of these, mean this young family now have 2.5 metres of practical storage on both sides of the fireplace. There’s plenty of room now for everything to be tucked neatly away out of sight.

With a “fireplace” on Jill’s wish list, I decided to make this the focal point of the room. I purchased a plug in, no flue required, electric fireplace which was perfect for this house being a 2 storey home with no chance of getting a flue installed overhead. Electric fireplaces only heat up 1 room unlike gas or wood fire versions which can heat up your whole home. This meant I could safely hang a new TV above it, without any concerns about fire safety. I continued the VJ cladding on the fireplace wall, installed oak shelving overhead & installed a beautiful self-adhesive wallpaper from Luxe Walls that adds a pop of colour & pattern to the space, without being overbearing. What’s also important to note is the colours in this room had to be on the more neutral side to not stimulate the girl’s autism.
DIVIDING THE ROOM INTO ZONES
When a room has to serve multiple purposes, it’s important to create defined zones to give each of the areas a purpose. My favourite way to create zones in an open plan space is by using rugs. In the relaxation zone where the sofas are located, I used this large rug from Fantastic Furniture to section off the sitting area. This really helped to define it as a place to chill out, read a book or watch TV. By arranging the furniture in a U-shape format around the fireplace, I was able to keep the space cosy without making the room feel smaller.


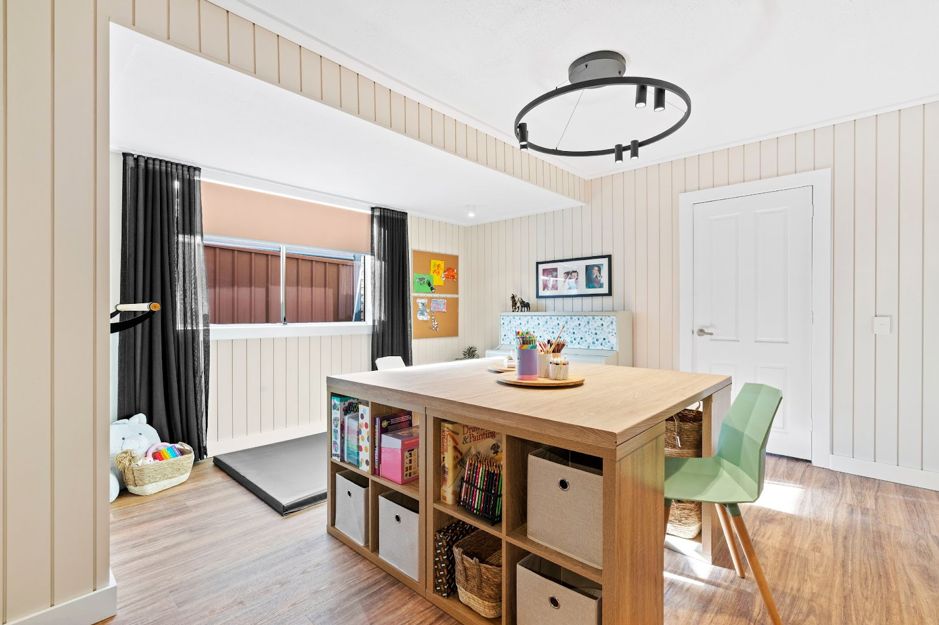
For the girls arts & crafts area, I created a 2 person arts & crafts desk & storage area, simply by buying 4 x Fantastic Furniture bookcases, screwing them together & installing 2 Trademaster Oiled Oil benchtops straight on top. A job for your carpenter!
As for young Ruby’s autism exercise area, a ballet bar (her favourite) was installed on one wall with an exercise mat on the floor that tucked neatly in the small alcove area.
LIGHTING UP THEIR LIVES
One of the biggest reasons this room looked so drab before was because of its poor lighting. The old concrete ceiling made it extremely difficult, almost impossible, to get a bank of new LED downlights in so instead, I opted for 2 big dramatic LED ceiling pendant lights from Beacon Lighting which contained 8 spotlights. This style of light enabled me to direct bursts of light into the areas of the room that really needed it most.
THE FINISHING TOUCHES
What brings a room to life is the property styling which all of our homeowners get to keep. As I’m always renovating on a budget, I sourced all the big pieces of furniture including the gorgeous Bayton 3 Seater Sofa from Fantastic Furniture. Most of the soft furnishings such as the fringed pink cushion, throws & decorator accessories, came from Kmart. All of these new pieces are now mixed in with the homeowners’ pieces they decided to keep, in a more tasteful way. The freshly upcycled piano slotted nicely on 1 wall with family photos mounted overhead.
Last but not least, those old window furnishings had to go. The fabric pelmets that were in the room previously were dated & bulky, plus they didn’t provide any real functionality. Instead, I got Wynstan Blinds to install these cute pink roller blinds to keep the light out & some dark sheers to add privacy without totally blocking out the light.I opted for darker curtains so they tied in cohesively with the black TV screen & those big black pendant lights!


All up, this renovation cost $38,685.69 for all the materials, labour, new furniture & styling items at full retail cost. Of this, materials accounted for $26,544.83 & labour at $12,140.86. The uplift in the property value was a staggering $130,000, resulting in a net profit of $91,314.31 for these deserving homeowners.
This renovation goes to show the power of renovating just one room in your home well & that rooms can successfully serve more than one purpose. While some stranger things needed to go into the room, with a bit of quick but thoughtful planning, all was possible in the end. Tune in at 7:30pm on Channel 9 next Saturday for Episode 3, a games room & garage renovation!
As always, if you have any questions on this episode, be sure to ask them below & my team or I will answer them for you. Until next week…..
Much love,
Cherie x


Stunning transformation. Love it and it’s become a modern, stylish and usable space. Love it❤️
Hey Anna – so glad you loved my renovation & I love especially that you took the time to tell me so. I’m such a lucky girl to have great followers like you in my community. Thanks a million. CB x
Thank you for sharing it in here. Not being able to watch your show as I am currently away in Singapore looking after my new born grand daughter. The transformation is amazing. The colours are so uplifting & refreshing. Once again, you are the best.
Such kind words, thank you very much Diana. Hope all is going great with your new born grand daughter 🙂 CB x
Wow. Cherie thanks for the blog. It’s hard to remember all the details even though you explain it in the show. I was trying to pick the budget. I was way over the final total so you are the queen 👸of bang for buck 💲!
Hi Vicki – glad you enjoyed the blog. I believe sharing is caring so happy to always be 100% transparent with costs etc of all my renovations. You’ll have to try and pick next weeks budget and maybe with each episode that goes to air, your budgeting skills will get better & better 😉 CB x
Well done, your optimism and energy is exhilarating to watch. Keep up the good work.
I’m blushing. Thank you so much Alfi for your super lovely words! CB x
Love the changes in This area from dark & depressing . To light bright usable space. The ideas in this show can be used by the average renovators not overly expensive & doable . Love your work
Thank you so much Kerry. That’s definately my area of specialty … doing renovations on a budget that normal, everyday people can afford to replicate. Glad you loved the reno & thanks so much for letting us know. CB x
It is funny that the TV installed so high up, close to the ceiling. The family must like to stand and watch tv all the time lol! Designer might not approve.
Hi CT – must be the way one of the photos looks but its not that high at all. I’m very particular (almost OCD) in getting those sort of finer details correct. Sometimes to the point of driving my tradies crazy! CB x 🙂
Amazing!! Have always been inspired by who you are and what you do ! Your Course has also endorsed and taught me more, enabling me to begin and continue my property developing dreams !
Awww Laura, you don’t know incredibly happy it makes me to read your words. So glad you have found my course so beneficial, that’s exactly why I created it. Keep kicking goals! CB x
I watched this transformation last night and have to say one of the best I had seen. I like the idea of dividing the room into zones I hadn’t seen this before. I do similar with my garden at the moment dividing it into rooms. Well done and congratulations to the team who worked on this. With the tight time limit and the hiccup with the cornice, it worked to time and budget. It all looks so easy when you have good tradesmen and a good producer too. It would have taken me years just to sort through the stuff let alone produce the room.
Hi Kayleen – thank you so much for your lovely words. Yes, dividing the room into zones was the key in making this a practical, multi-purpose space that didn’t feel like a mish-mash of things. My team & I only just managed to get it finished in the nick of time! CB x
I record the shows so I re watch them. I loved series 1 and this one looks even better! I also love that you keep a budget in mind and use high end costly items! Lucky people! Well done.
Thanks so much Di we are so pleased you love Space Invaders. You can watch any episode anytime on 9Now as well if you don’t want to record them, Cherie Crew x
So glad you love the show Di & yes, I’m always renovating on a budget, we never want to overcapitalise! CB x
Inspiration exudes and radiates!
Thanks so much Jenny, Cherie Crew x
Such a great comment. Thank you so much JC! CB x
Oh Cherie, this is just stunning! Your transformation work never ceases to amaze.
Thank you so much for such lovely words, Cherie Crew x
Oh, thank you so much. I really appreciate you taking the time to tell me this. Its hard work but lucky I love my work! CB x
Terrific! Sorry I missed seeing this on TV last night, but the sliders show off the before and after! I am also impressed by the $130,000 improvement in the home value! Way to go! You make it look so easy!
Thanks so much Roxanne for your lovely feedback. You can watch any missed episodes of Space Invaders on 9Now, Cherie Crew x
Hi Dr Roxanne, so glad you loved the reno & yes the uplift in value was fantastic. It was 2 days hard yakka but definately worth it for the family. You can also catch any missed episodes on the 9Now app. CB x
Gosh I love your work Cherie (and Pete, Angie and team) simply transformative 👏🏻👏🏻👏🏻
So happy to hear this Trish & thank you for taking the time to write such a lovely comment. Much appreciated. CB x
slide feature doesn’t appear in Chrome.
Thank you for letting us know that PS. I’ll get my technical team to check that out. Many thanks. CB x
Love how you divided space on this renovation, your choice of colours are remarkable bringing out a more roomy feel the furniture is just fabulous lovely choices, great job by all of the crew on Space Invaders.
Glad you really liked the reno Col. Thank you so much for telling us so. CB x
You nail every room, Cherie! I’m in awe of your creative talent and vision. What I love most about your designs is that they are very achievable for everyday decorators and you don’t spend stacks of cash on designer pieces. The way you execute your designs gives us all inspiration and motivation. Thank you so very much, my Husband and I are huge fans of you and the entire show.
Thank you so much Bianca for such lovely feedback & so happy that your both loving Space Invaders, Cherie Crew x