


How to Renovate a Kitchen: The Order of Works
It’s one of the most expensive rooms in the house to renovate, so if you’ve decided to project manage your kitchen reno and bring in the various trades, good on you – just be sure you’re up to the challenge.
Every renovation project is going to differ according to the works required. You may be taking down or adding walls to rejig the layout, or maybe laying new floors. In other words, the “scope of works” and the “order or works” will vary depending on how grandiose your plans are.
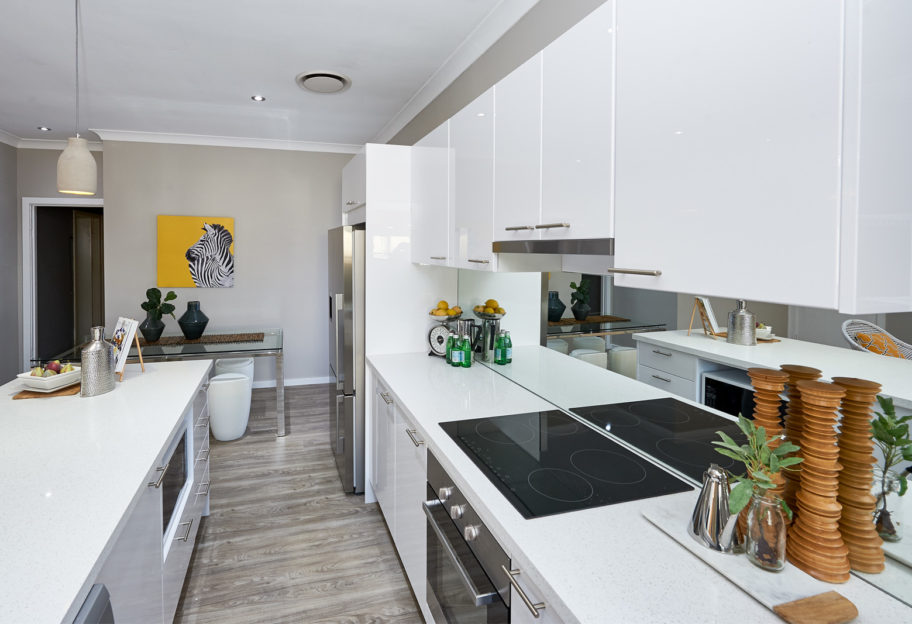
^ With this renovation the bones of layout were kept the same and only updated with new cabinetry and appliances.
The aim is to streamline all your works as much as possible to avoid unnecessary visits by tradies and complete your renovation in the shortest time possible.
While it’s impossible to provide a “one size fits all” approach for any renovation, there are some basic steps you might typically encounter as part of a project. For a kitchen renovation, your steps might look something like below…
1. FLOOR PLAN DESIGN
Are you leaving the footprint of the kitchen exactly the same and merely replacing what’s there, or are you completely reinventing the whole space? Maybe you want to take out some walls, make the space open plan and add in an island bench? Before any work starts, you need to have a clear, documented plan of what your new kitchen will look like.
2. ISOLATION AND DISCONNECTION OF SERVICES
You don’t want to be swinging any sledgehammers around until you have the plumber and sparkie in to disconnect all your kitchen services: water, gas and electricity.
3. DEMOLITION
Now you’re ready to get rid of the existing kitchen; old appliances, cupboards, tiles… they all need to go! You want to be left with a completely clean slate. If you’re upcycling anything such as the cabinetry carcasses, be sure to remove carefully and store safely out of the way.
4. WALL & FLOOR INSTALLATION
You may need to subtract or adds walls to make your new kitchen work and the flooring will need to be in position too. This is the stage when the new walls are mapped out which may involve the installation of timber wall framing – a chippie can do this for you.

5. PLUMBING & ELECTRICAL ROUGH IN
You’ll need to get your plumber and electrician back to do whatever “rough in” is needed to run new pipes and wiring, move power points, etc.
6. PATCHING AND REPAIR
You might need to put sheeting up or patch up the spots where the new electricals and plumbing have been roughed in. This is the time to get everything in tip-top shape ready for painting, cabinet installation and tiling.
7. PAINTING
There’s a lot of debate about when to paint: do you wait for everything to be finished and paint last thing (you’ll be trying to get a paint brush into impossible spaces), or do it now before all the cabinets go in? I’m for painting at this stage, then you can just do touch-ups when the job is all completed.
8. CABINET INSTALL
Your kitchen is now a bare shell, so you’re ready for your flatpack kitchen to go in. Floor cabinets go in first, followed by wall cabinets.
9. BENCHTOP INSTALLATION
The benchtops are ready to go in. Either the cut-outs for the appliances will have been done in the factory or they’ll be done onsite by the installer.
10. SPLASHBACK INSTALLATION
Have your tiler around to put in a tiled splashback, or if you’ve ordered a glass splashback, this is the stage it will be installed.
11. INSTALL APPLIANCES
All those smart new (and hopefully bargain) appliances and sink you’ve had safely stashed away are ready to come out of their boxes and be installed. Sometimes this may happen at the same time as when the benchtops are being installed.
12. FINAL PLUMBING AND ELECTRICAL FIT OUT
You’re on the home stretch now. The plumber and electrician pay one more visit to connect up all your shiny new appliances. Once you’ve done those final paint touch-ups, you’re ready to crack the cork on the Champagne and heave a sigh of relief!
While this has given you an overview as to the order in which works happen, if you really want to manage your kitchen renovation like a pro, check out my Create Your Perfect Kitchen course. It goes into far more detail about what you need to consider, comes with a project plan template to keep you on track, and explains how you can work with a builder or cabinetmaker to get the kitchen you’ve always dreamed of, minus the hefty price-tag.


Thanks for your information on kitchen renovations. My husband and I would like to update our cabinets and drawers. I’ll start looking for a quality renovation specialist. https://www.elbornes.com.au/kitchens-and-bars
Nice guide on planning a kitchen renovation really detailed and on point article.
Thank you so much Alex. Really appreciate your feedback. C x
Like!! Thank you for publishing this awesome article.
Awesome post Cherie my wife and I are also planning to renovate our kitchen. But I guess we need to take out some appliances and stuff the are no longer needed or will be replaced. I was thinking of getting a self storage box. Would that be practical? Saw this one https://smartbox.com.au/ and it got interested to their services and packages.
Hi Mark, the self storage boxes are great for storing items you want to keep. I’ve used Taxibox in the past with no complaints! If you no longer want or need the items, best just to dispose of the items straight away, rather than storing them as you’ll be incurring an unnecessary cost in hiring the storage boxes. The storage boxes are great though to store other items you want to keep like all your plates, cups etc, as well as any tools needed in your renovation like paint so they are out of your way during construction. Cherie Crew x
Hello Cherie, I’ll also check Taxibox to keep our options open. Thanks for the additional advice 🙂 More power to your blog
Thanks for the great tips on kitchen renovations! I especially appreciate the reminder to plan the layout beforehand. In your experience, what are some of the biggest mistakes people make when planning a kitchen renovation?
Some of the biggest mistakes in kitchen renovations include underestimating budget needs, overlooking functionality for aesthetics alone, neglecting proper measurements and space utilization, failing to account for enough storage solutions & not hiring qualified tradies to do the work. Additionally, rushing decisions without thorough research can lead to regrettable choices in materials or layout. Cherie Crew x